Appearance
Image Storage
With the Stripo Plugin, you have the flexibility to choose where all your images should be stored, and this feature is available for all pricing plans. While Stripo provides its own storage as the default option, you may prefer to use your own storage solutions for better control and management.

Please be advised that there might be a limitation to the use of the Stripo storage depending on the selected Plugin subscription plan. In order to have full control over the images used by your users in newsletters, we do recommend keeping them on your own file storage servers.
Default Stripo Storage
Stripo offers default storage for your images, but depending on your Plugin subscription plan, there might be some limitations. To have full control over the images used by your users in newsletters, it is recommended to store them on your own file storage servers.
Custom Storage Options
If you prefer not to use Stripo's storage, you can configure the Plugin to use any other preferred storage option. Below are the configurations for the Custom AWS S3 bucket, Azure Blob storage, Cloudinary, and your own server.
Custom AWS S3 Bucket
Custom AWS S3 bucket is a Plugin application configuration feature that allows you to easily connect your own Amazon Web Services S3 bucket to our Plugin for storing images.
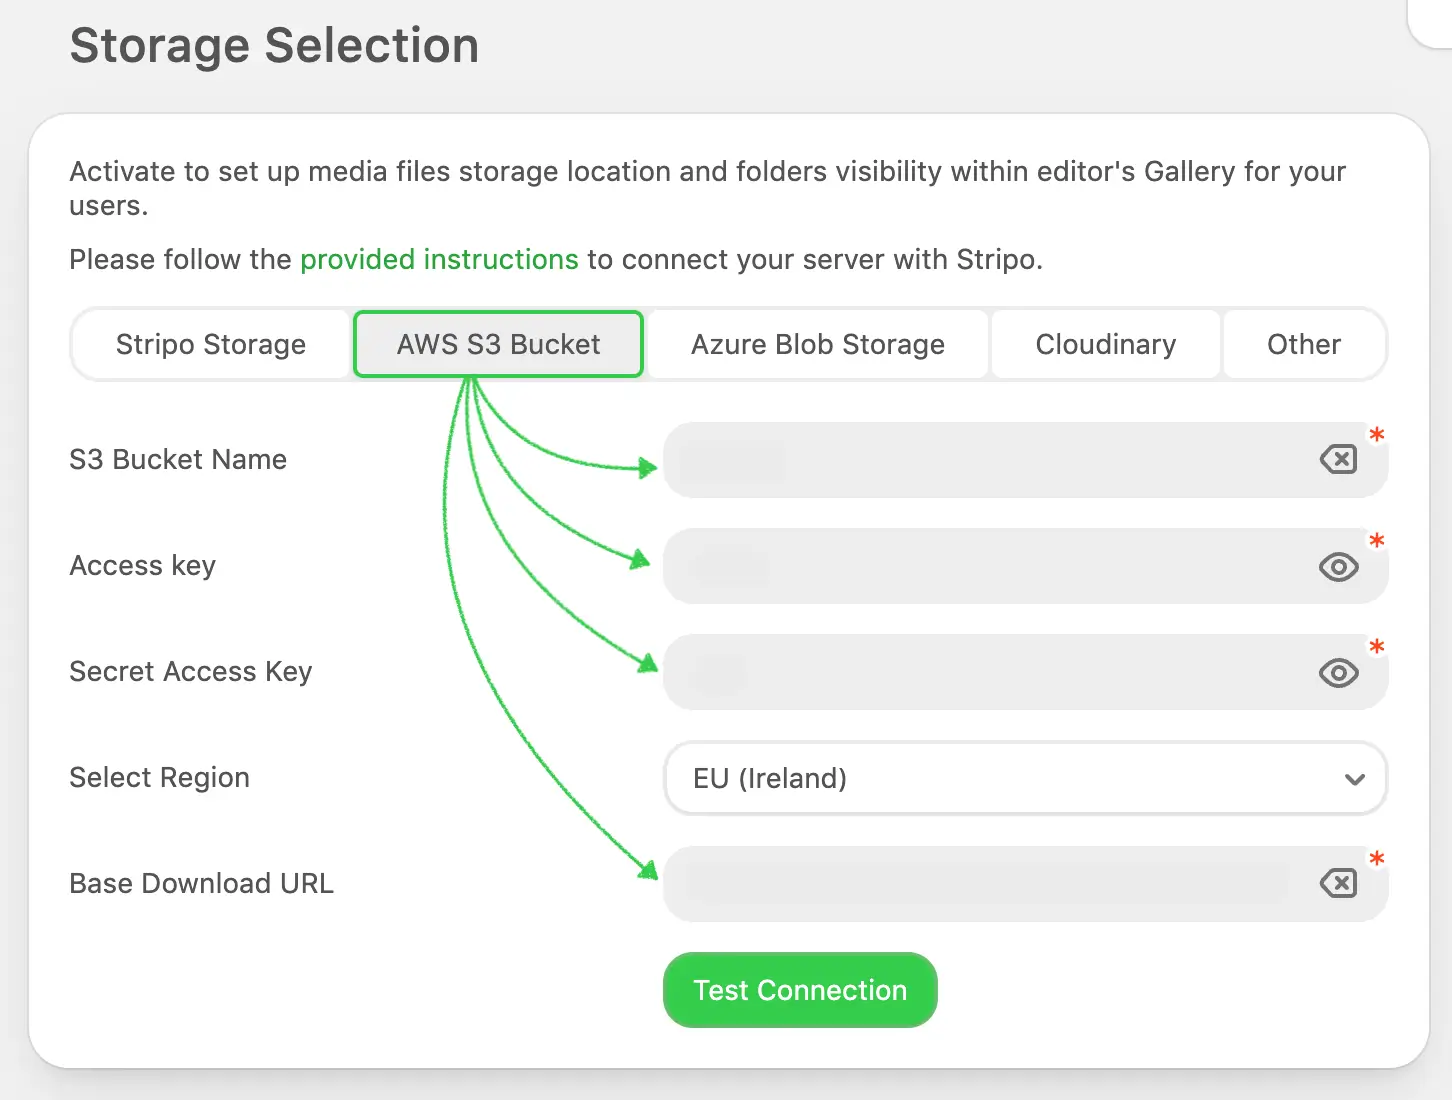
If you choose this option, you’ll have to fill out a form to establish a connection with your storage. Please take a look at the image above to see the description of the form fields with specifications regarding the information required for each of them.
| Parameter | Required | Description |
|---|---|---|
| S3 bucket name | Yes | The name you assigned to the bucket when creating it. |
| Access key | Yes | You can provide AWS Root Account Credentials or IAM User Credentials (we recommend the second option for security reasons). The provided account must have the “Read” and “Write” access to the given bucket. More about AWS credentials. |
| Secret access key | Yes | You can provide AWS Root Account Credentials or IAM User Credentials (we recommend the second option for security reasons). The provided account must have the “Read” and “Write” access to the given bucket. More about AWS credentials. |
| Region | Yes | AWS region where you created the bucket. |
| Base download url | Yes | Define the path that will be specified at the beginning of each URL to the images hosted in your S3 bucket. For example, it may be your CDN domain name or any other address, depending on your server configuration. |
Please make sure that the provided account has the Read and Write access to the given bucket.
Configuration of AWS S3 Storage
To create custom AWS S3 storage, you need to:
- Create an Amazon AWS account.
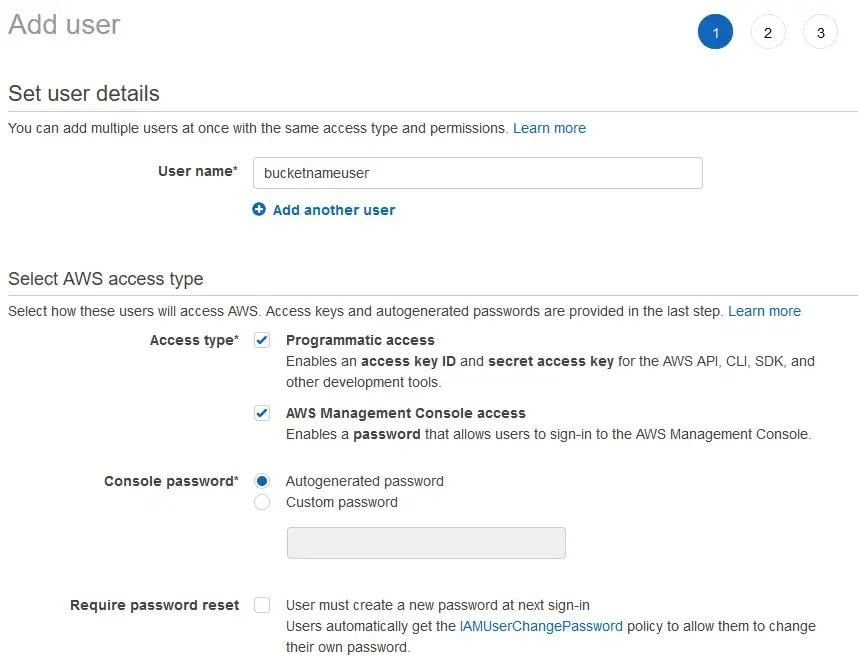
Create an IAM user with S3 bucket permissions.
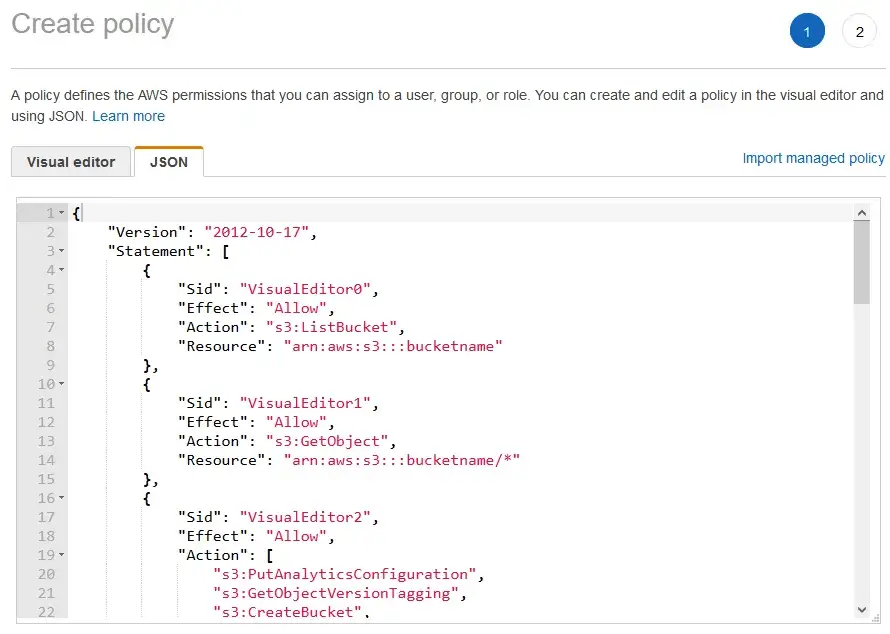
Create IAM policy:
json{ "Version": "2012-10-17", "Statement": [ { "Sid": "VisualEditor0", "Effect": "Allow", "Action": [ "s3:GetObject", "s3:PutObject", "s3:GetBucketCORS", "s3:DeleteObject", "s3:ListBucket" ], "Resource": [ "arn:aws:s3:::bucketname", "arn:aws:s3:::bucketname/*" ] } ] }Please be advised that you should replace the
bucketnamevalue with the name of your bucket created in your AWS account.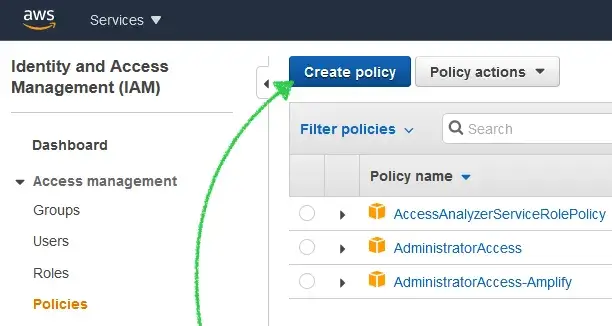
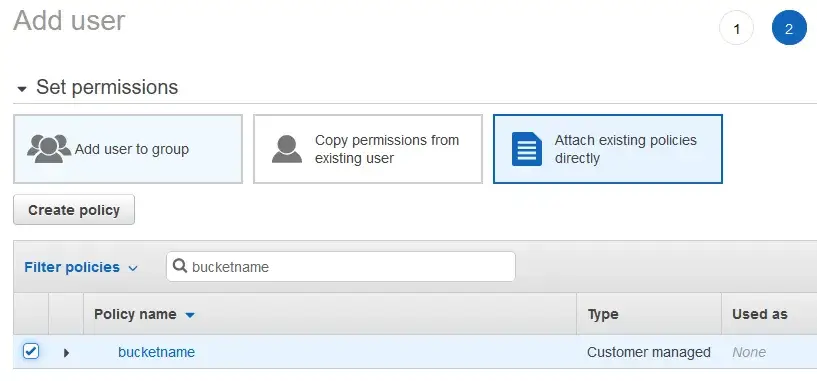
Assign the created policy to the IAM user:
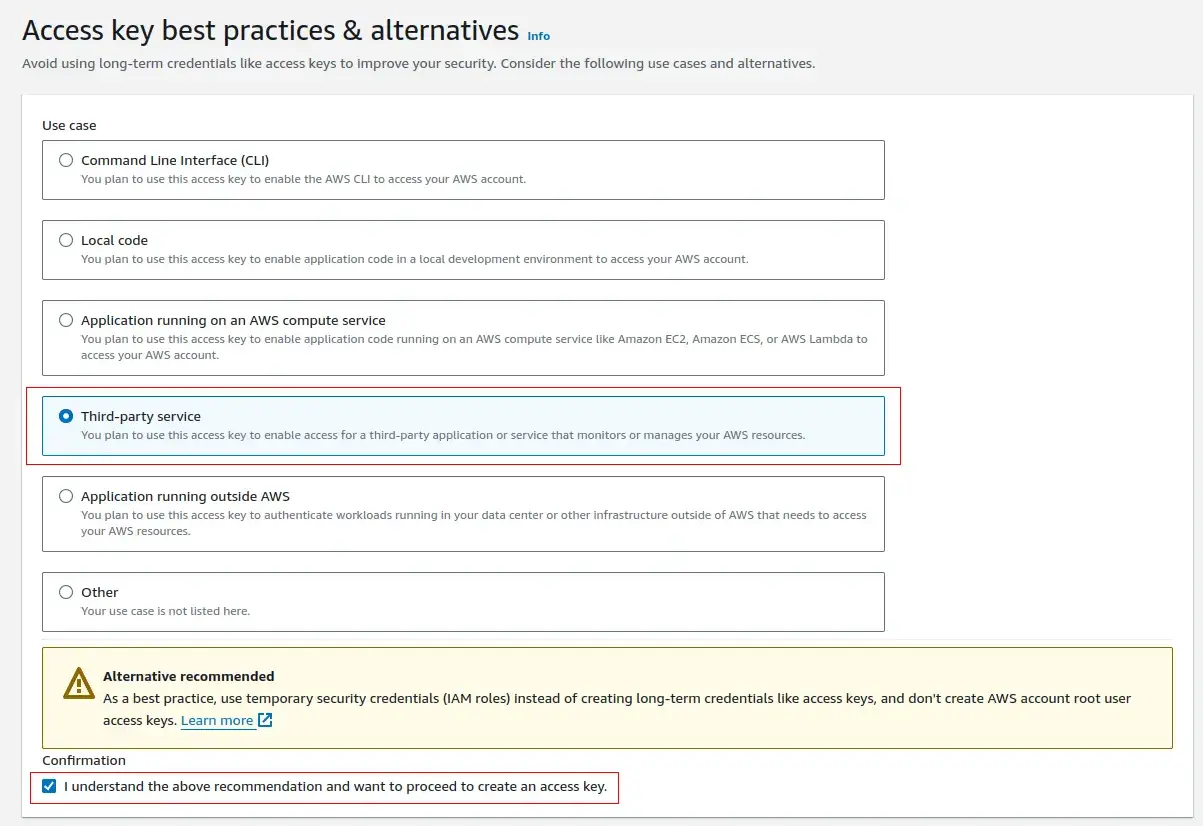
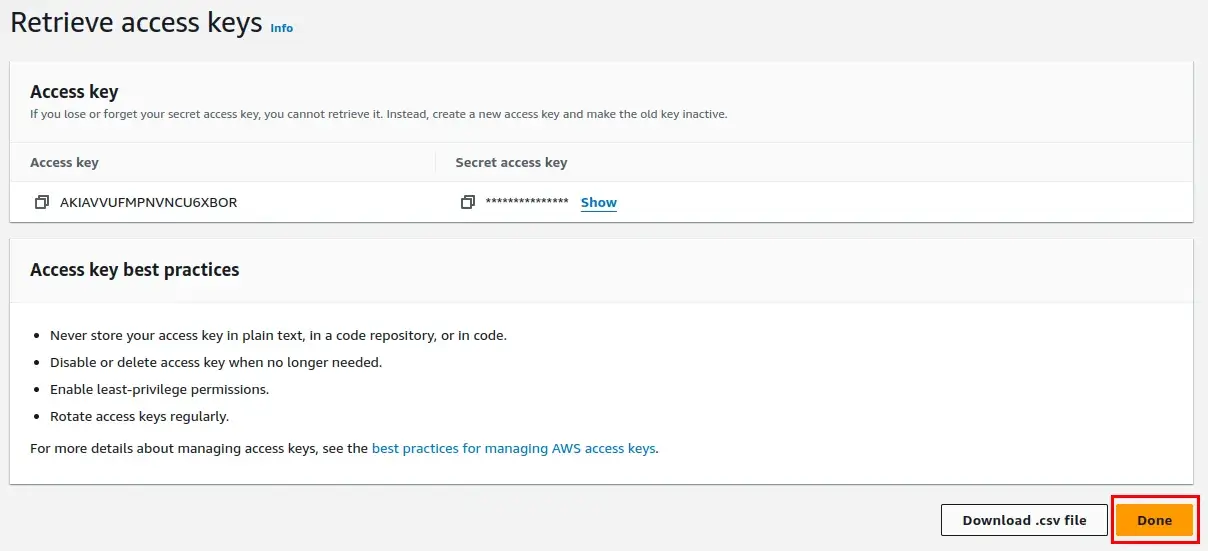
Create access key:


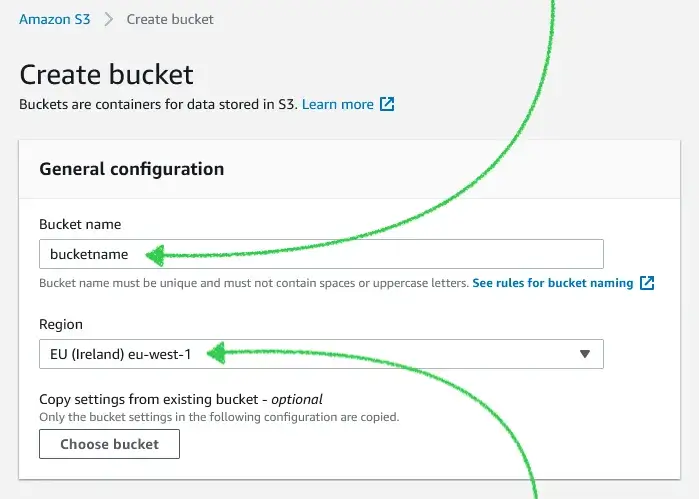
Create the S3 bucket with a necessary custom name and in a necessary region:
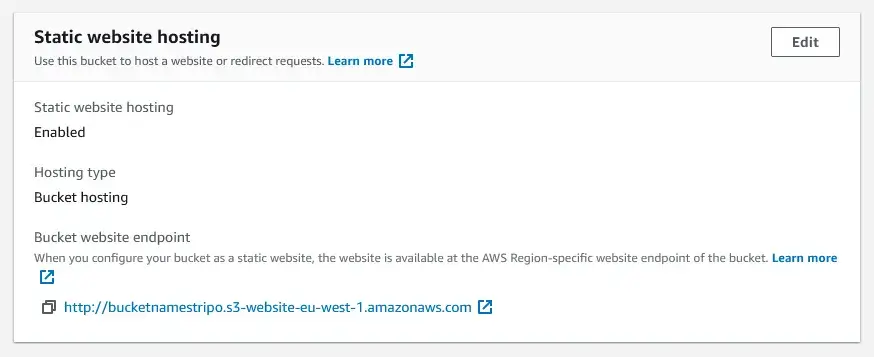
Choose Static website hosting and index document index.html:
Set Bucket permission policy.
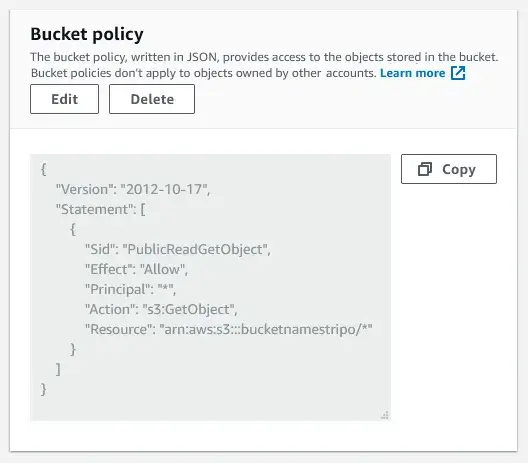 json
json{ "Version": "2012-10-17", "Statement": [ { "Sid": "PublicReadGetObject", "Effect": "Allow", "Principal": "*", "Action": "s3:GetObject", "Resource": "arn:aws:s3:::bucketname/*" } ] }Please be advised that you should replace the
bucketnamevalue with the name of your bucket created in your AWS account.Use the example below to generate a Base Download URL:
For example:https://{bucket}.s3.{region}.amazonaws.combucket- bucketnameregion- eu-west-1 (Ireland)
https://bucketname.s3.eu-west-1.amazonaws.comDeactivate Objects from the bucket permissions:
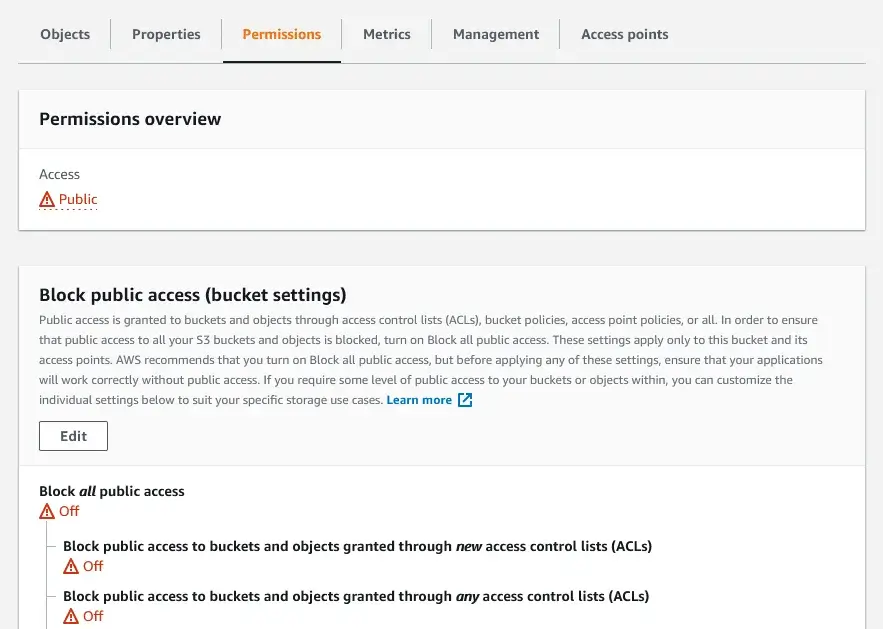
Use the following items below only if the connection is not configured directly to the AWS bucket, but if nginx is used as a proxy.
Add settings to web server, e.g., nginx: Optional
jsonlocation /content { add_header 'Access-Control-Allow-Origin' '*'; proxy_pass http://{{ S3_BUCKET_URI }}/; proxy_redirect off; }- Enter “YOUR_DOMAIN_ADDRESS/content” as “Base Download URL” when you configure the Plugin settings. Optional
Azure Blob Storage
Azure Blob storage is a Plugin application configuration feature that allows you to easily connect your own Azure storage account to our Plugin for storing images.
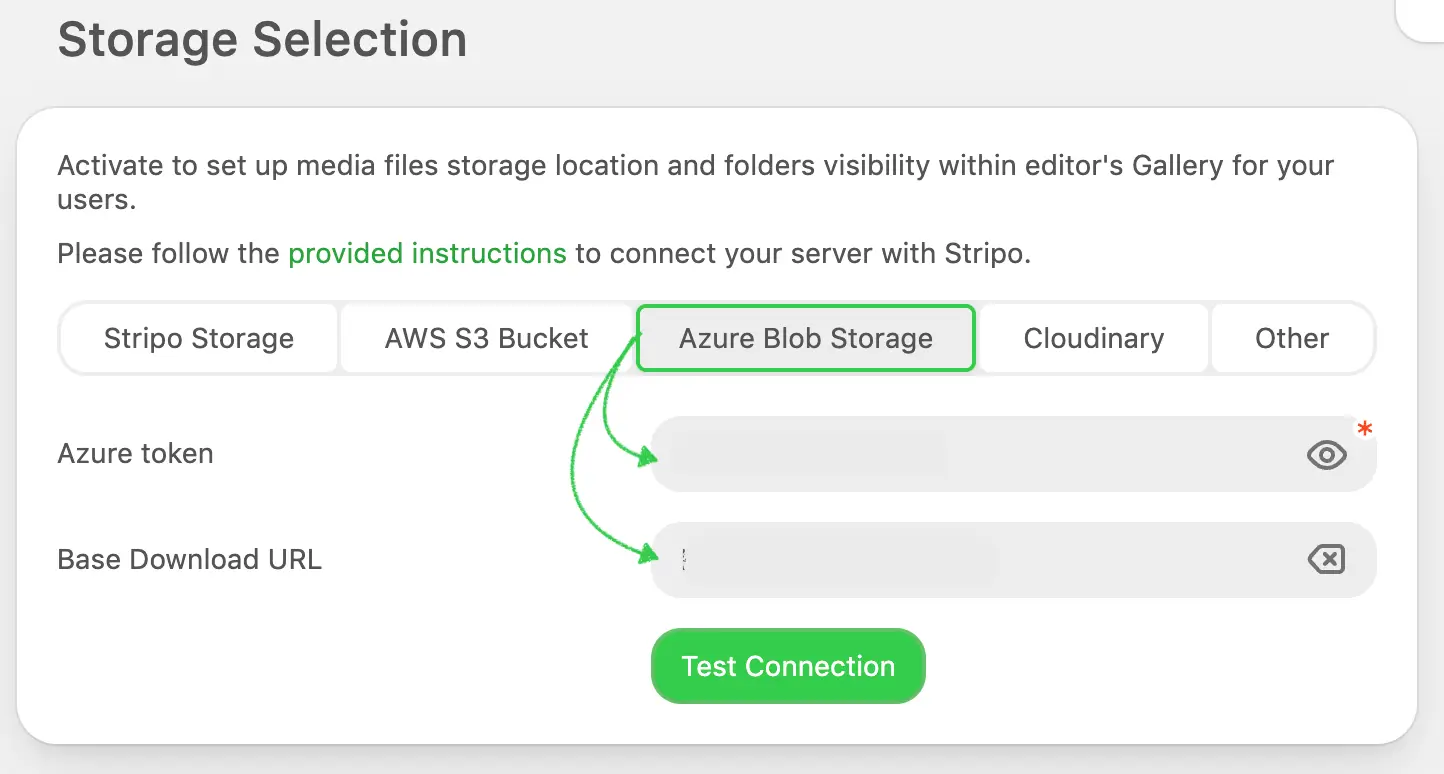
To do so, you need to generate a connection string in your Azure portal account:
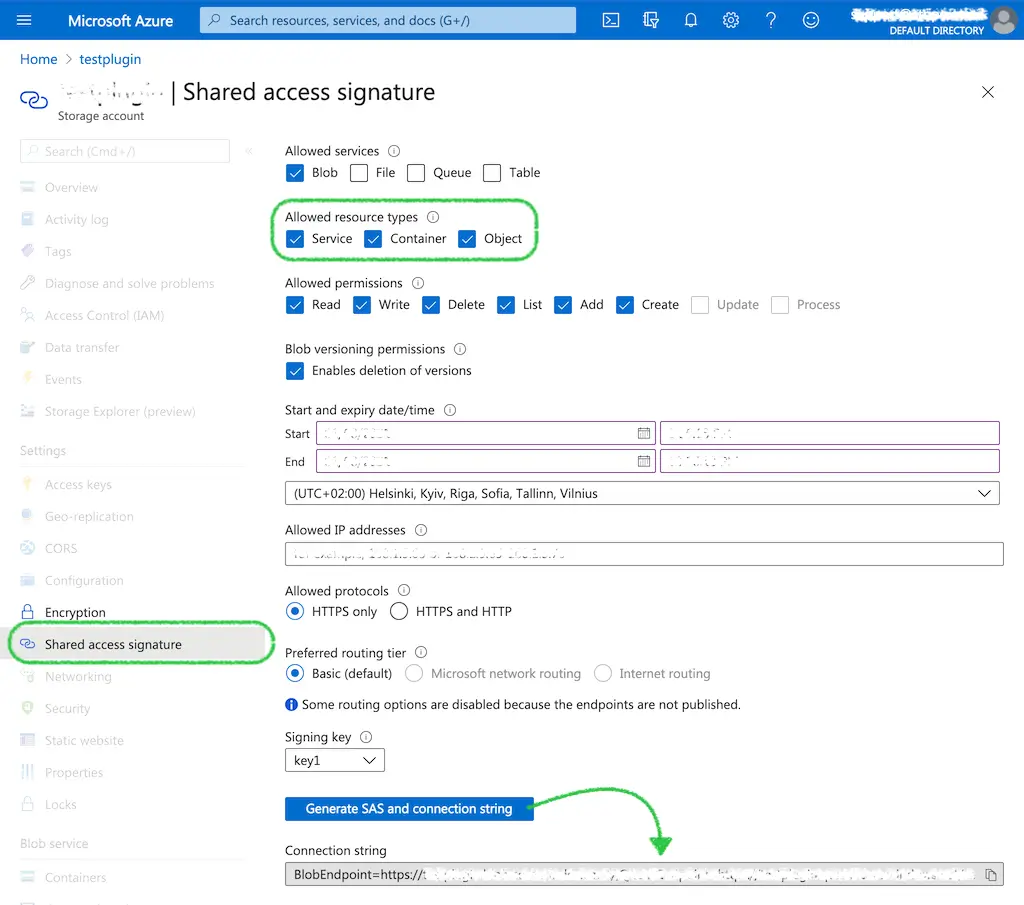
If you choose the “Azure Blob Storage” option, you will have to fill out the form to establish a connection with your storage. Please take a look at the image above to see the description of the form field with specification regarding the information that you will need to enter there:
| Parameter | Required | Description |
|---|---|---|
Azure connection string | Yes | Connection string from your azure portal account. |
Cloudinary
Cloudinary allows you to manage, optimize, and deliver images seamlessly across different platforms. To store your images using Cloudinary, follow these steps:
- Create a Cloudinary Account.
Visit Cloudinary's website and sign up for an account.
- Obtain API Credentials.
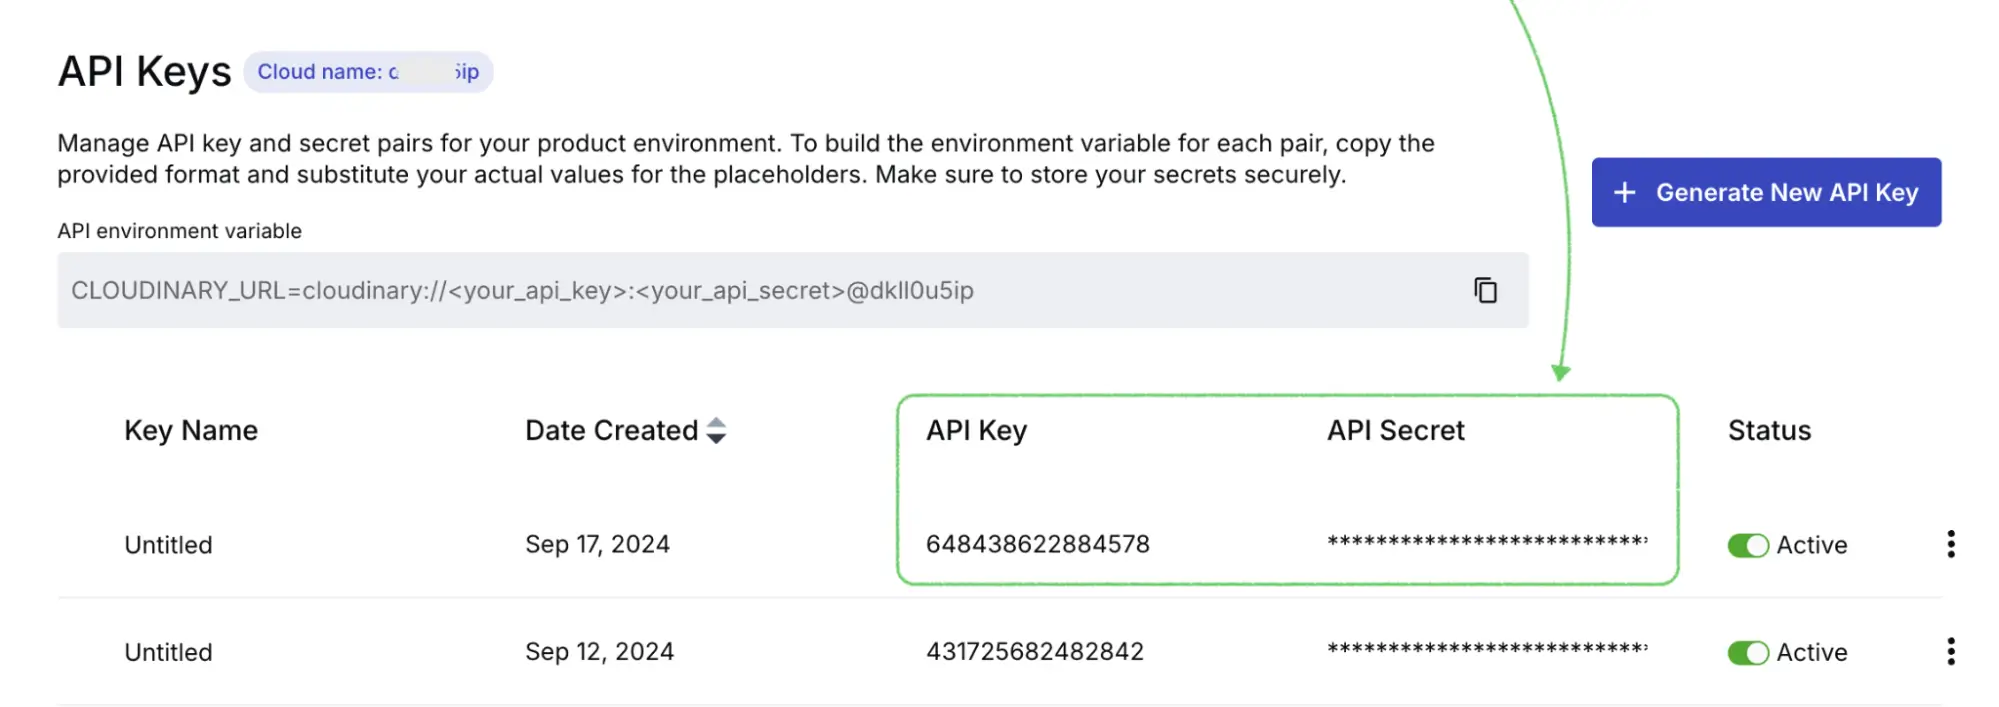
Navigate to the "Programmable media" menu and switch to your Cloudinary dashboard to find your Cloudinary URL, API key, and API secret.

At the top of the page, next to the "API Keys," you can find the cloud name. Copy it and paste it into the required field in Stripo while connecting Cloudinary.

After, generate a new API key.

Once generated, it will appear in the list of all API keys. Copy the API key and API Secret and pass them to our field in your Stripo account.
- Configure in Stripo
In the Stripo plugin, go to the Image Storage configuration and select the Cloudinary option.

Enter the Cloudinary URL, API key, and API secret.
- Test Your Configuration
Upload an image via Stripo and ensure it is stored and accessible through your Cloudinary account.
Google Cloud
We are now also integrated with Google Cloud so you can connect it with Stripo and store your images here.
Let's now check how to set it up and find the credentials needed to connect it.
Create a Project in Google Cloud.
Please open the link and press on the Console;

In the top of the screen, open the "Project Selector" and choose "New Project";

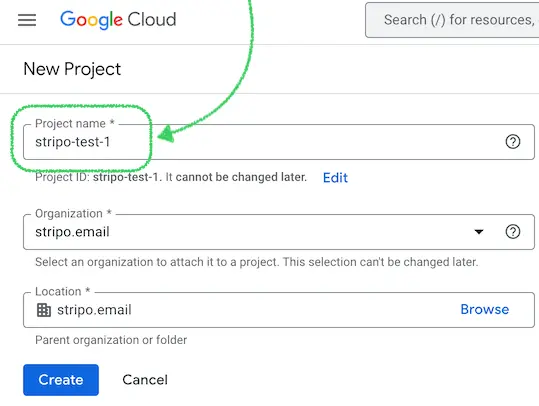
Create the project by filling in the required details:
📝 "Project Name" (needed later in Stripo settings);
🏢 "Organization" (if applicable).
Click Create.
After the project is created, open it through "Notifications" → "Select Project";
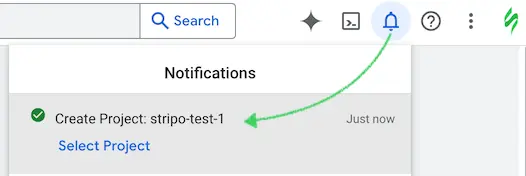
or choose it from the list;

Create a Storage Bucket.
Inside your Google Cloud project, navigate to "Cloud Storage";
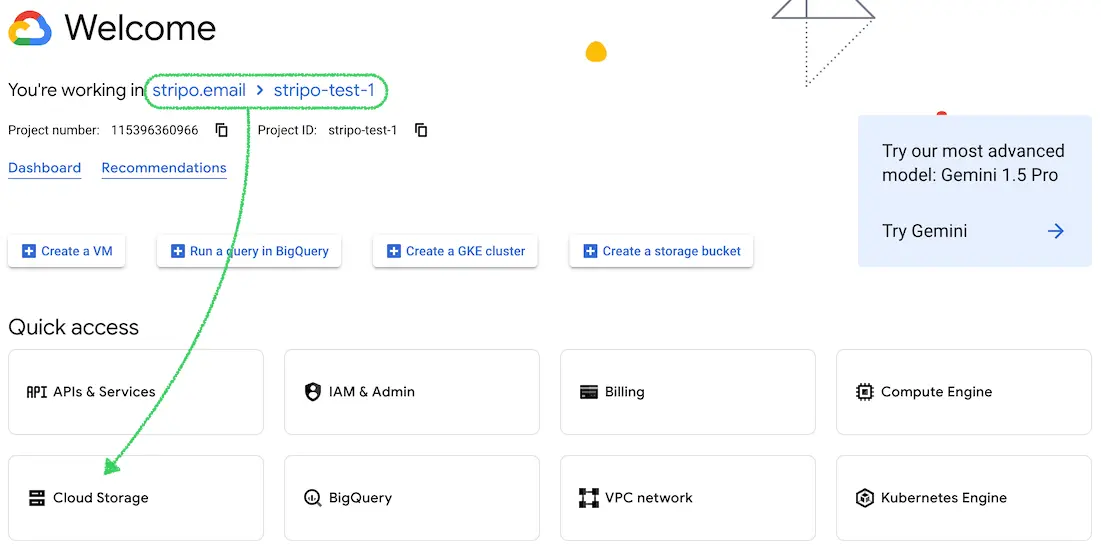
Click on "Buckets" → "Create";

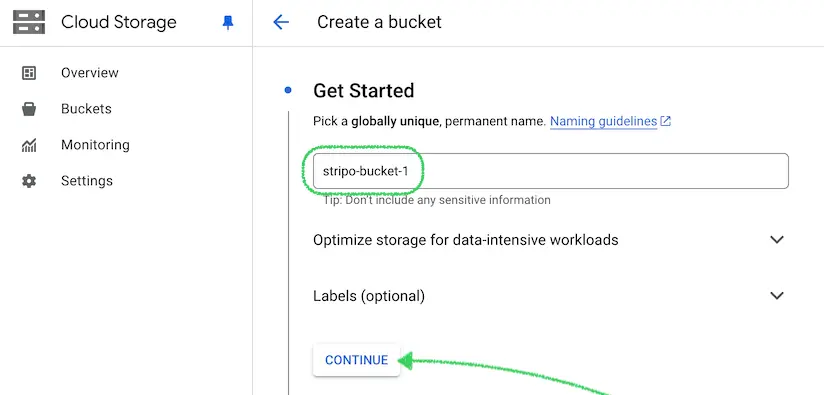
Enter a "Bucket Name" (remember it for later use in Stripo settings).
You can skip the other settings and press "Continue";
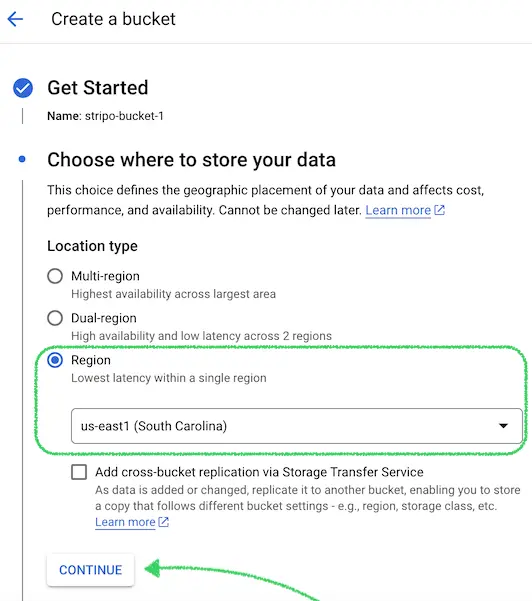
Select a "Region" for data storage and click "Continue";
Important Note: The cost of Google Cloud services varies based on your selection here.
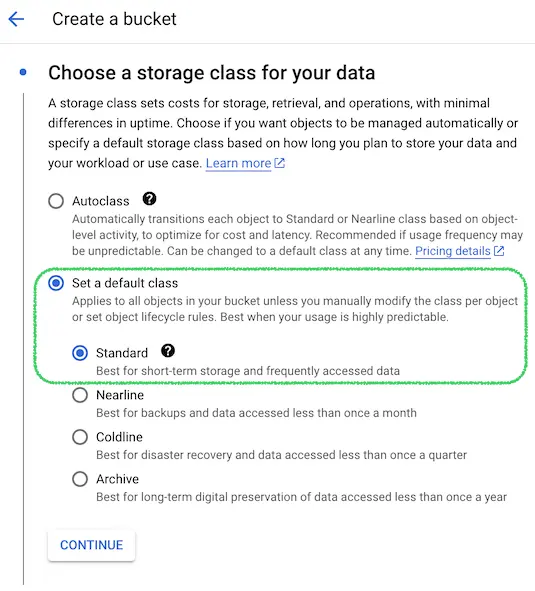
Choose "Storage Class" (recommended: Standard) and click "Continue";
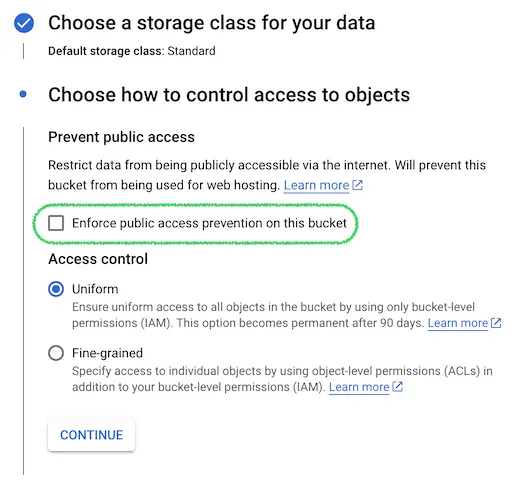
Under "Access Control", uncheck "Enforce public access prevention on this bucket" and select "Uniform";
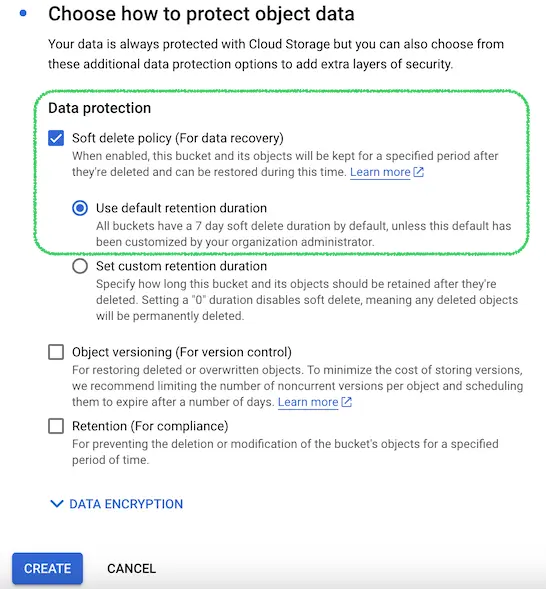
On the next step, leave the default settings "Soft delete policy (For data recovery)" and press on "Create" button;
Important Note: Stripo does not actually delete data from your bucket, instead, we soft delete it.
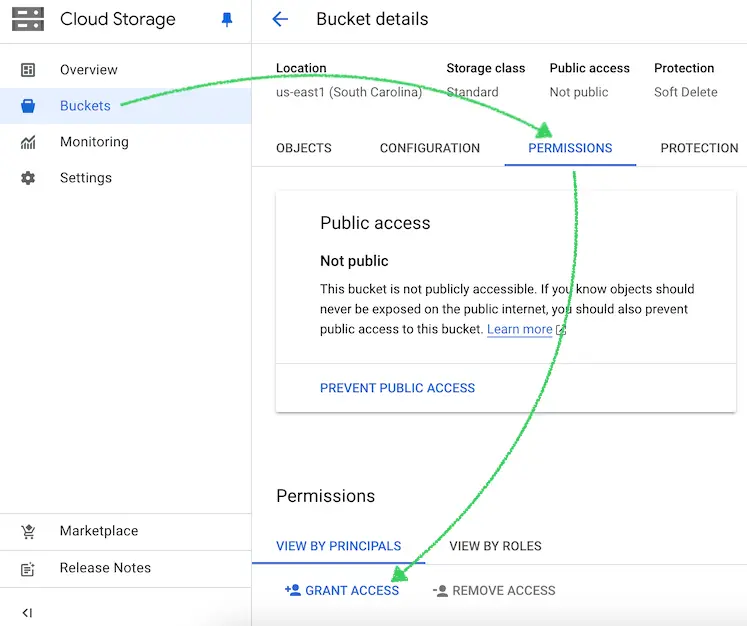
🌐 Make the Bucket Public:
Go to your newly created "Bucket" → "Permissions" → "Grant Access";
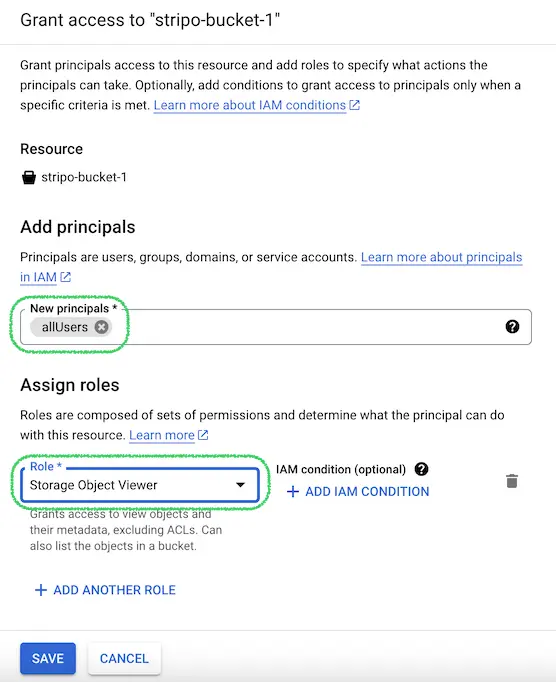
Add "allUsers" as a principal and assign the role "Storage Object Viewer";
Click "Save" and allow public access;
Refresh the page and verify that the bucket's public access is set to "Public to Internet".

Create a Service Account.
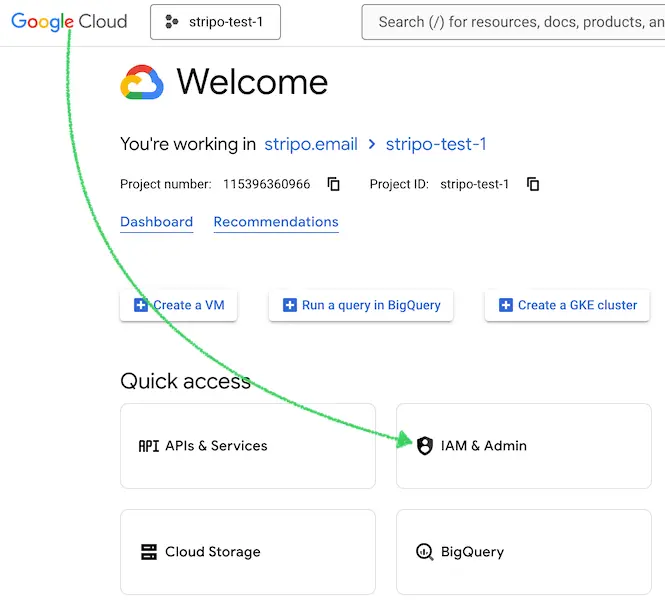
Go to the "IAM & Admin" section on the main page;
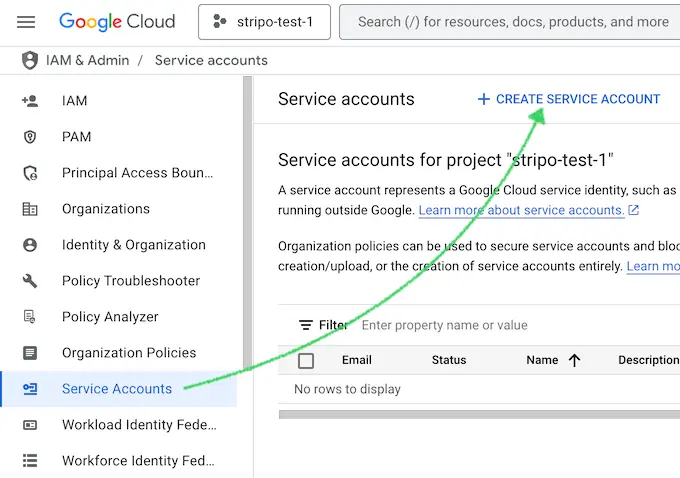
Click on "Service Accounts" and then "Create Service Account";
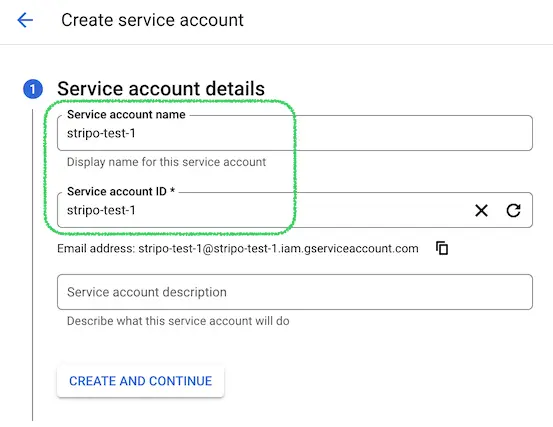
Provide a suitable name for the service account and click "Create and Continue";
In the next step, add the "Storage Object User" role and click "Continue";
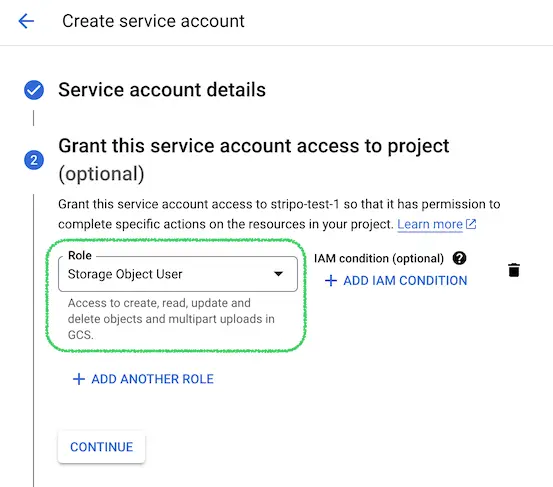
You can skip the next step Grant users access to this service account (optional) and press "Continue".
Generate the Key for the Service Account.
Press on your service account;
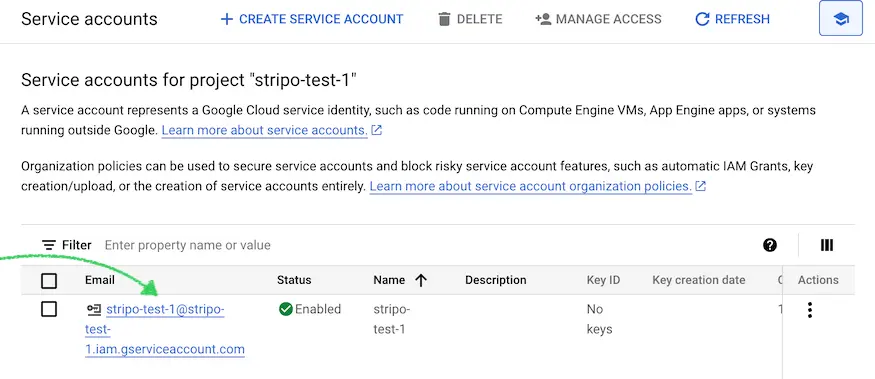
Please press on "Keys" → "Add Key" → "Create new key" and choose "JSON" type and click "Create";
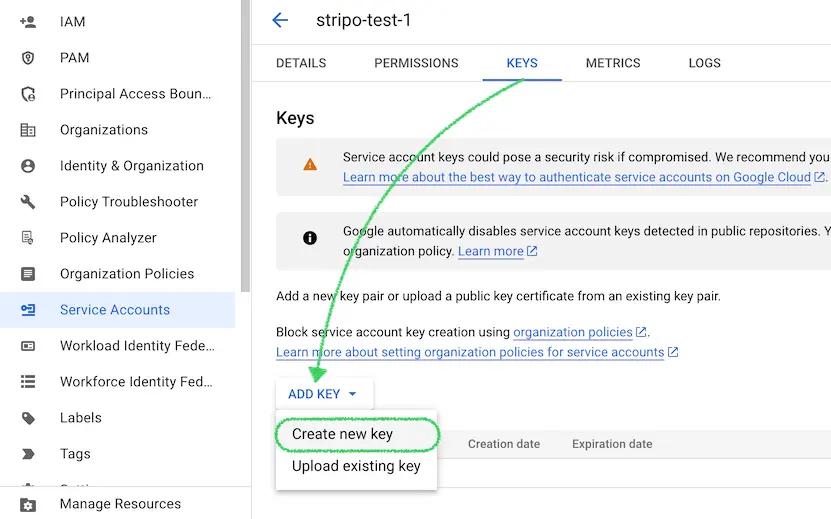
Save the downloaded key file to your desktop (this is the third piece of information needed for Stripo);

Add the Credentials in Stripo.
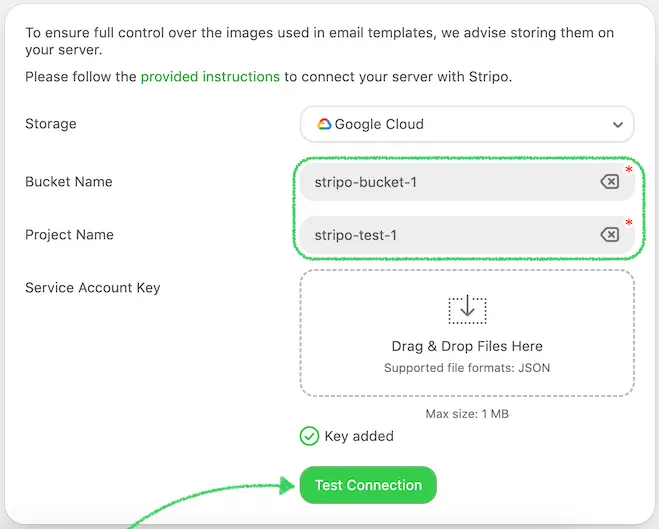
Open your Stripo Image Storage settings;
Enter the "Bucket Name", "Project ID", and upload the "Service Account Key";
You're all set!
Connecting Your Own Server
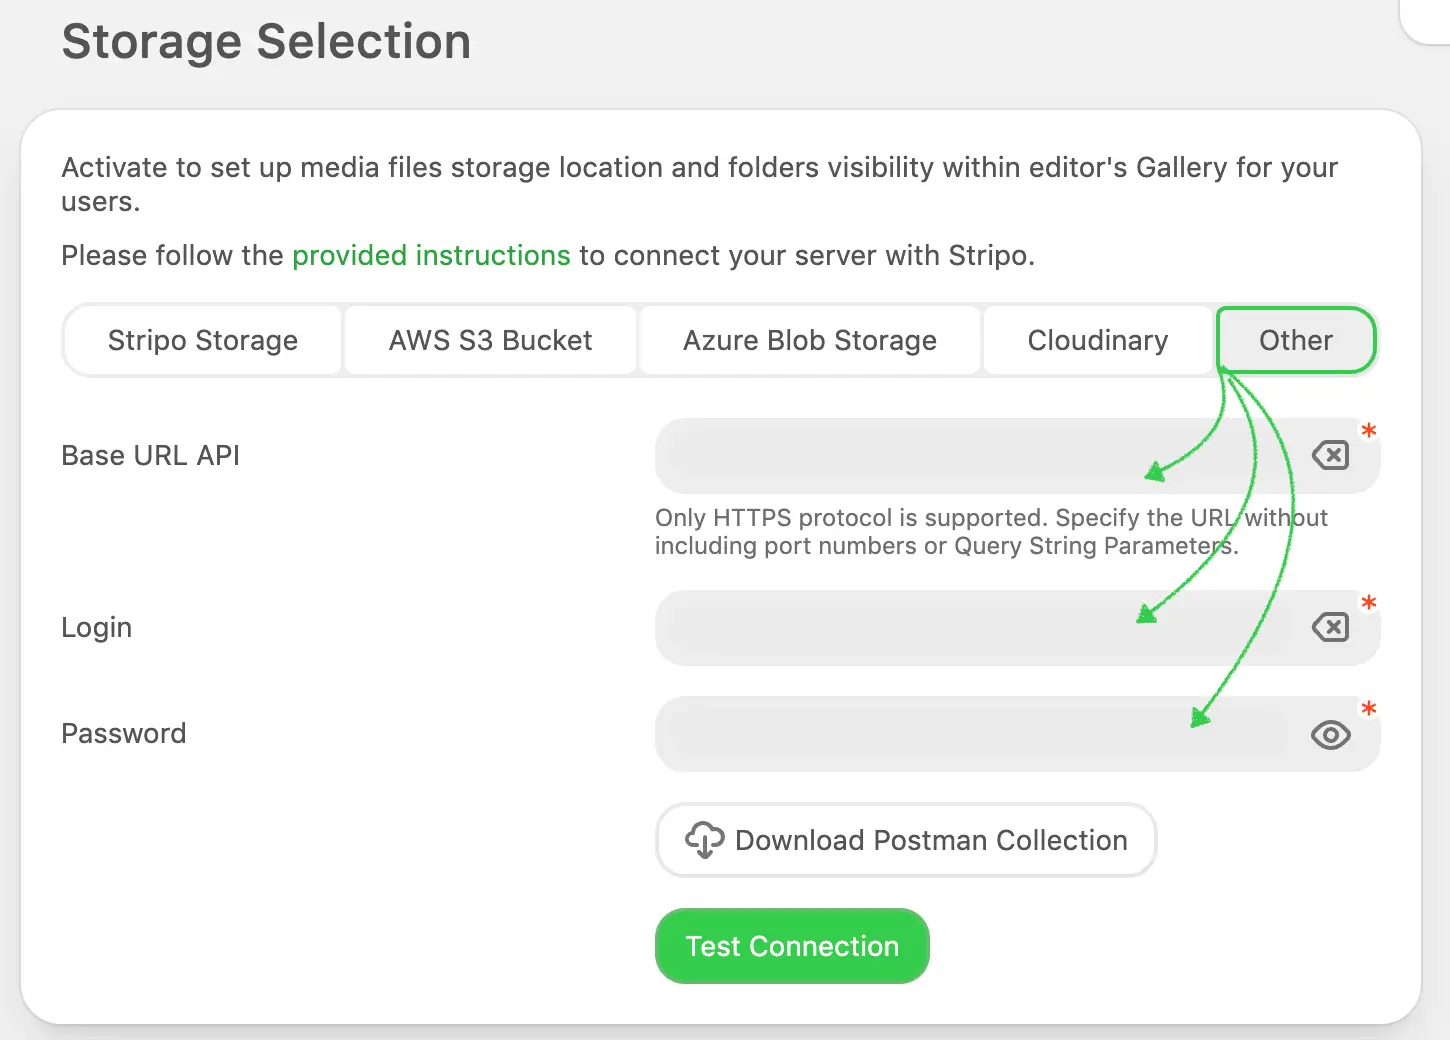
This option may be the best choice for you if you’re using another storage type or want to build a more custom and flexible solution to host your images. We created a way to connect the Plugin to a custom file system provider (via HTTPS protocol), allowing you to use the Stripo editor with your own file storage, no matter which technology you use.
It is required to support the set of the methods described below to provide successful communication between the two systems: the Stripo server and yours.
The Basic Authentication is used to send these requests, so please make sure that you have specified the correct Login, Password, and Base API URL on the Stripo Plugin details page of your Stripo account (if you don’t have an account, please sign up).
Note, that your storage must support chunked-encoding mode if you want to get logs about any request. See more here
OpenAPI Specification
Reference
yaml
openapi: 3.0.1
info:
  title: Stripo Plugin Storage API
  description: |
    It is required to support the set of the methods described below to provide successful communication between the two systems: the Stripo server and yours.
    The Basic Authentication is used to send these requests.
    Note, that your storage must support chunked-encoding mode if you want to get logs about any request. See more [here](https://github.com/ardas/stripo-plugin-samples/blob/master/server-side-api-file-uploader/bin/application.properties).
  version: 1.0.0
servers:
  - url: https://{YOUR_BASE_URL}
    description: Base URL for API requests
    variables:
      YOUR_BASE_URL:
        default: ''
components:
  securitySchemes:
    basicAuth:
      type: http
      scheme: basic
  schemas:
    Document:
      type: object
      properties:
        url:
          type: string
          description: Absolute URL to the document.
        originalName:
          type: string
          description: Document name.
        uploadTime:
          type: integer
          description: Document upload time in milliseconds.
        size:
          type: integer
          description: Document size in bytes.
        height:
          type: integer
          description: Document height in pixels (px).
        width:
          type: integer
          description: Document width in pixels (px).
        thumbnailUrl:
          type: string
          description: Absolute URL of document preview thumbnail.
    Folder:
      type: object
      properties:
        key:
          type: string
          description: Generated key for the folder.
        documents:
          type: array
          items:
            $ref: '#/components/schemas/Document'
paths:
  /:
    get:
      tags:
        - Methods
      summary: Get list of files
      description: Allows you to retrieve a list of files within specified folders. This method helps you manage and access your file directory efficiently by providing a comprehensive list of available files in the targeted folders, streamlining your workflow and file management within the Stripo platform.
      security:
        - basicAuth: []
      parameters:
        - name: keys
          in: query
          required: true
          description: Comma-separated list of folder keys.
          schema:
            type: string
      responses:
        '200':
          description: A list of documents grouped by folder keys.
          content:
            application/json:
              schema:
                type: array
                items:
                  $ref: '#/components/schemas/Folder'
    post:
      tags:
        - Methods
      summary: Upload file to storage
      description: Enables you to upload an image to a specified folder in your storage. This method facilitates the organization and management of your images by allowing you to easily add new files to designated locations within your Stripo storage, ensuring your media assets are well-organized and readily accessible.
      security:
        - basicAuth: []
      requestBody:
        content:
          multipart/form-data:
            schema:
              type: object
              properties:
                key:
                  type: string
                  description: Folder key where the file will be uploaded.
                file:
                  type: string
                  format: binary
                  description: Multipart file to be uploaded.
      responses:
        '200':
          description: Uploaded file details.
          content:
            application/json:
              schema:
                $ref: '#/components/schemas/Document'
  /delete:
    post:
      tags:
        - Methods
      summary: Remove file from storage
      description: Marks a file as removed, so it is no longer displayed within the folder for the customer. Physically, the file is not deleted from storage, ensuring data integrity and the possibility of recovery if needed. This method helps maintain an organized and clutter-free storage view for users.
      security:
        - basicAuth: []
      requestBody:
        content:
          application/json:
            schema:
              type: object
              properties:
                url:
                  type: string
                  description: Absolute URL to the document.
      responses:
        '200':
          description: Successful deletion response.
          content:
            application/json:
              schema:
                type: object
                properties:
                  message:
                    type: string
  /info:
    get:
      tags:
        - Methods
      summary: Get file info
      description: Allows you to retrieve detailed information about a specific file. This information helps your customers see useful details in the editor once the image is selected on the UI, enhancing their file management and editing experience within the Stripo platform.
      security:
        - basicAuth: []
      parameters:
        - name: src
          in: query
          required: true
          description: Absolute URL of the document.
          schema:
            type: string
      responses:
        '200':
          description: Specific file information.
          content:
            application/json:
              schema:
                type: object
                properties:
                  originalName:
                    type: string
                    description: Document original name.
                  size:
                    type: integer
                    description: Document size in bytes.
security:
- basicAuth: []Parameters
| Parameter | Description |
|---|---|
key | Generated automatically from the Plugin ID and the value specified in the Folder path field. For example, key=0000000_99999, where 0000000 is the Plugin ID and 99999 is the value set to the Folder path. |
documents | An array of the uploaded documents grouped by Key. |
url | Absolute URL to the document. |
originalName | Document name. |
uploadTime | Document upload time in milliseconds. |
size | Document size in bytes. |
height | Document height in pixels (px). |
width | Document width in pixels (px). |
thumbnailUrl | The absolute URL of the document preview thumbnail. |
Please be advised that the keys for system images (used for a banner block, a video block, and module thumbnails) have different types than those described above. The keys for system images are as follows:
- Video block:
pluginId_[application_id]_video - Banner block:
pluginId_[application_id]_banner - Module thumbnail:
pluginId_[application_id]_modules
Where [application_id] is the Plugin ID of your application.