Appearance
Modules Library
What Are Modules
If you want to offer your users interesting structures with a non-standard layout or provide the opportunity to save particular elements separately from the entire email (such as structures, containers, or stripes) for future use, you can do so with modules.
Modules are reusable components of email templates that help users design emails faster and maintain consistent branding across all campaigns.
Each module can include one or several blocks — such as text, images, buttons, or banners — combined into a single editable element.
You can save the following types of content as modules:
Stripe — defines a full-width section (row) of an email layout.
Structure — represents a column layout inside a stripe, used to organize content horizontally.

Container — a content holder inside a structure where blocks like text, images, or buttons are placed.
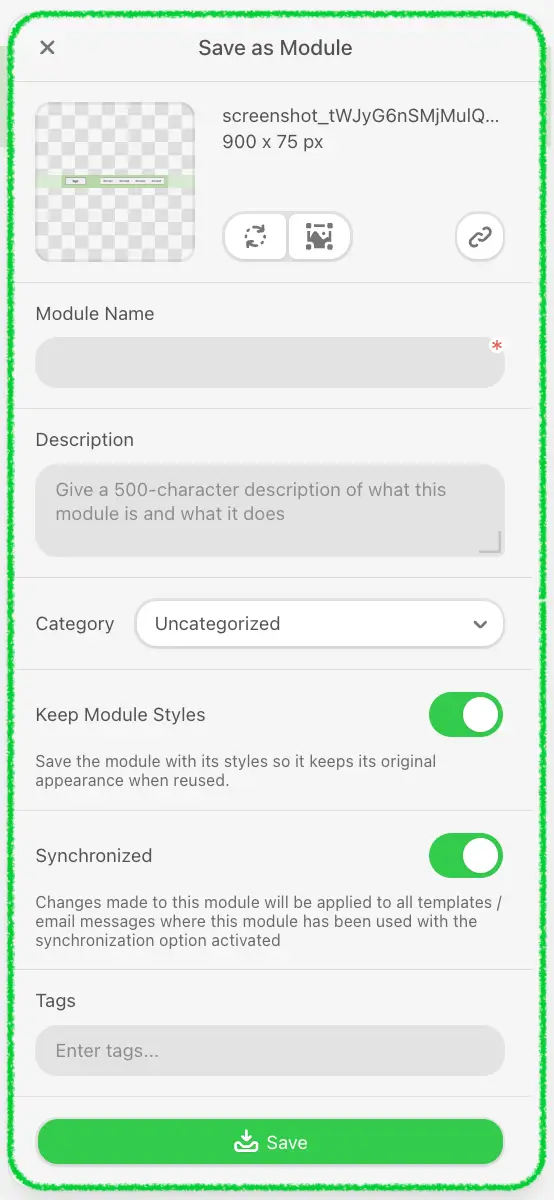
After you click on the “Save as Module” button, you will see the automatic window where you can:
- Give the module a name on the settings panel;
- Enter a description (optional). The description will later help you understand what content this module contains;
- Select a category for easy search;
- You can activate ”Keep module styles” - when enabled, the control allows users to preserve the visual appearance of a module by inlining global appearance styles from the email message into the module’s HTML when the module is saved. This helps ensure that the module keeps its original design when reused in other email messages. To use it, please add the corresponding parameter to the initialization;
- Also, you can activate Synchronization - changes made to this module will be applied to all templates / email messages where this module has been used with the synchronization option activated. To activate this feature, please add the corresponding parameter;
- Enter tags. The "Tags" field lets you group saved modules by tag. You can add one or several tags. Then, choosing the modules, you will see that your modules are grouped by tags;
- Click "Save".
Editing Modules in a Standalone Editor
Besides saving modules from inside an email, you can launch the editor in a dedicated Module Editing Mode to create or edit a single module on its own — useful for building a "New module" or "Edit module" flow in your application. This mode is enabled with the entityType: 'module' initialization parameter and is available on the Enterprise plan.
See Module Editing Mode for the full parameter reference, behavior, and limitations.
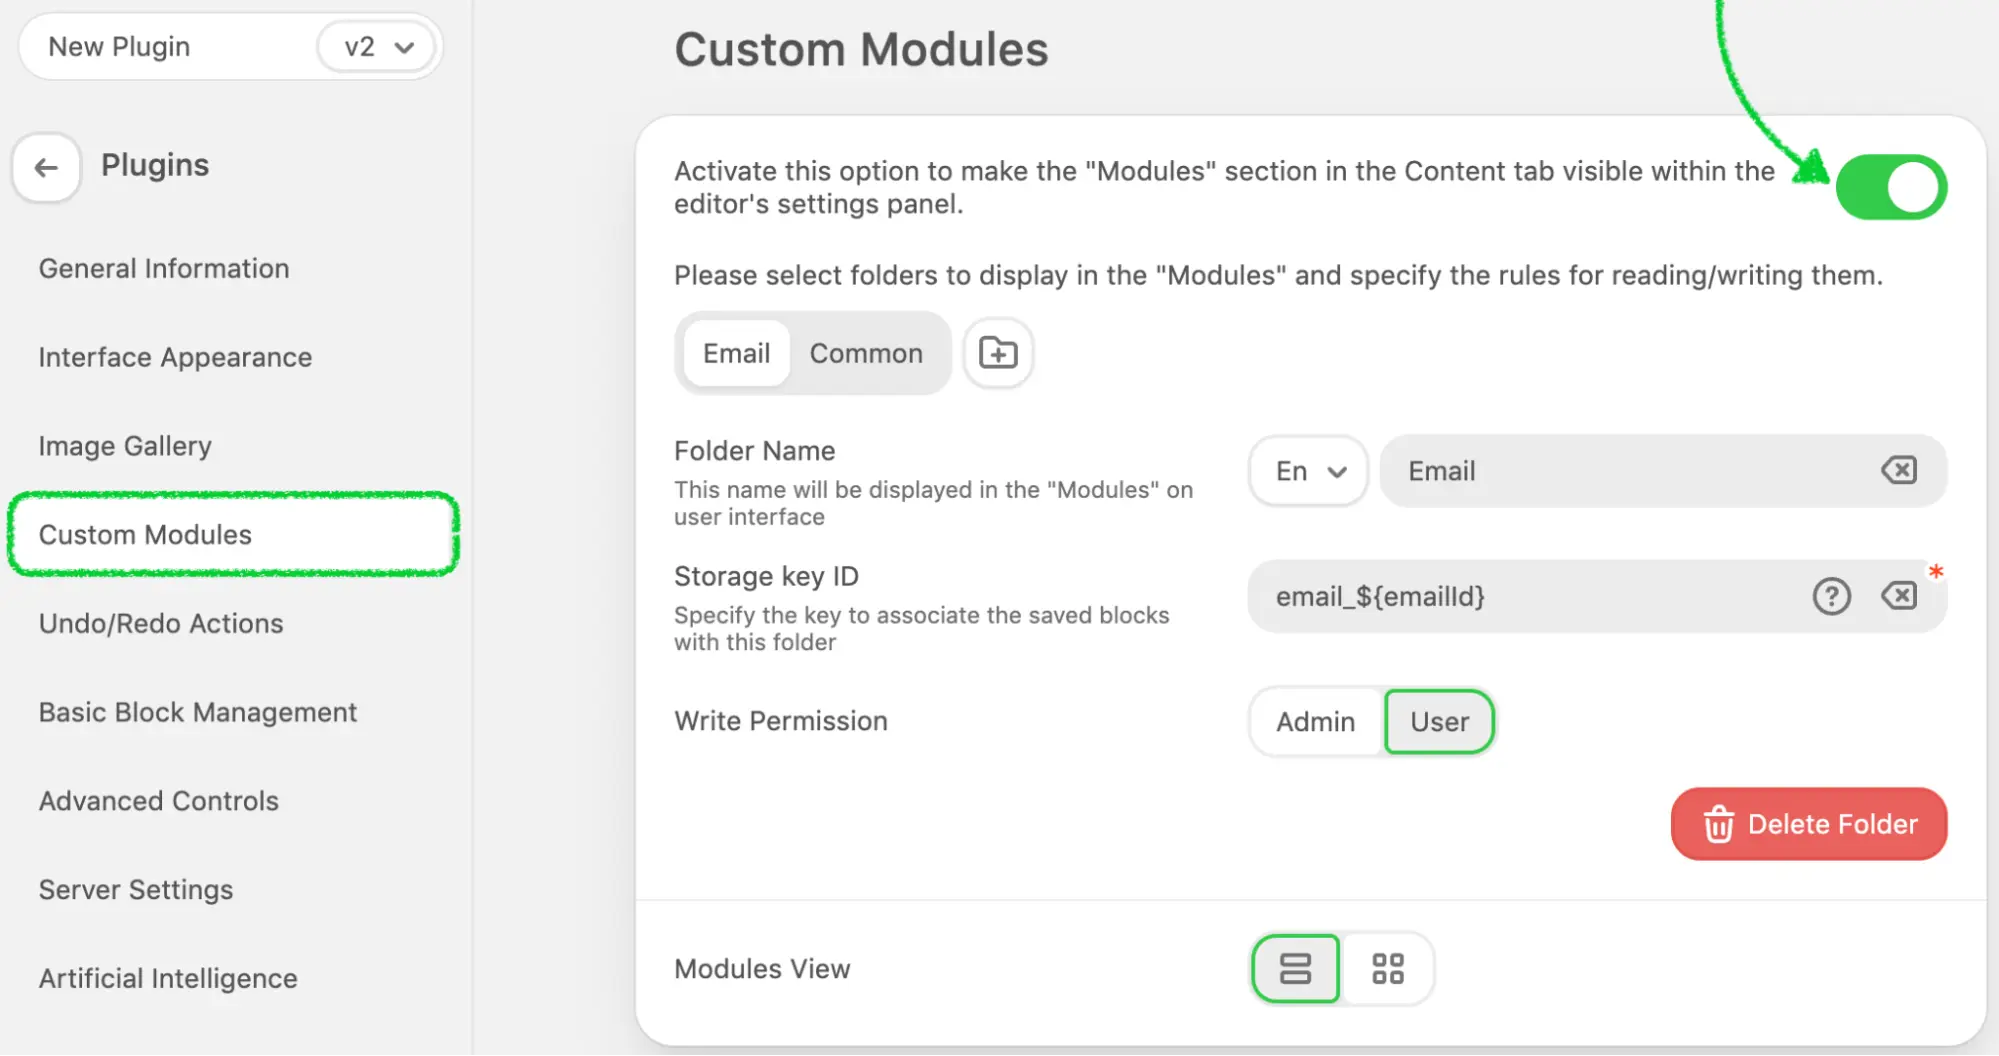
Configuring the Modules Feature
Enabling Modules
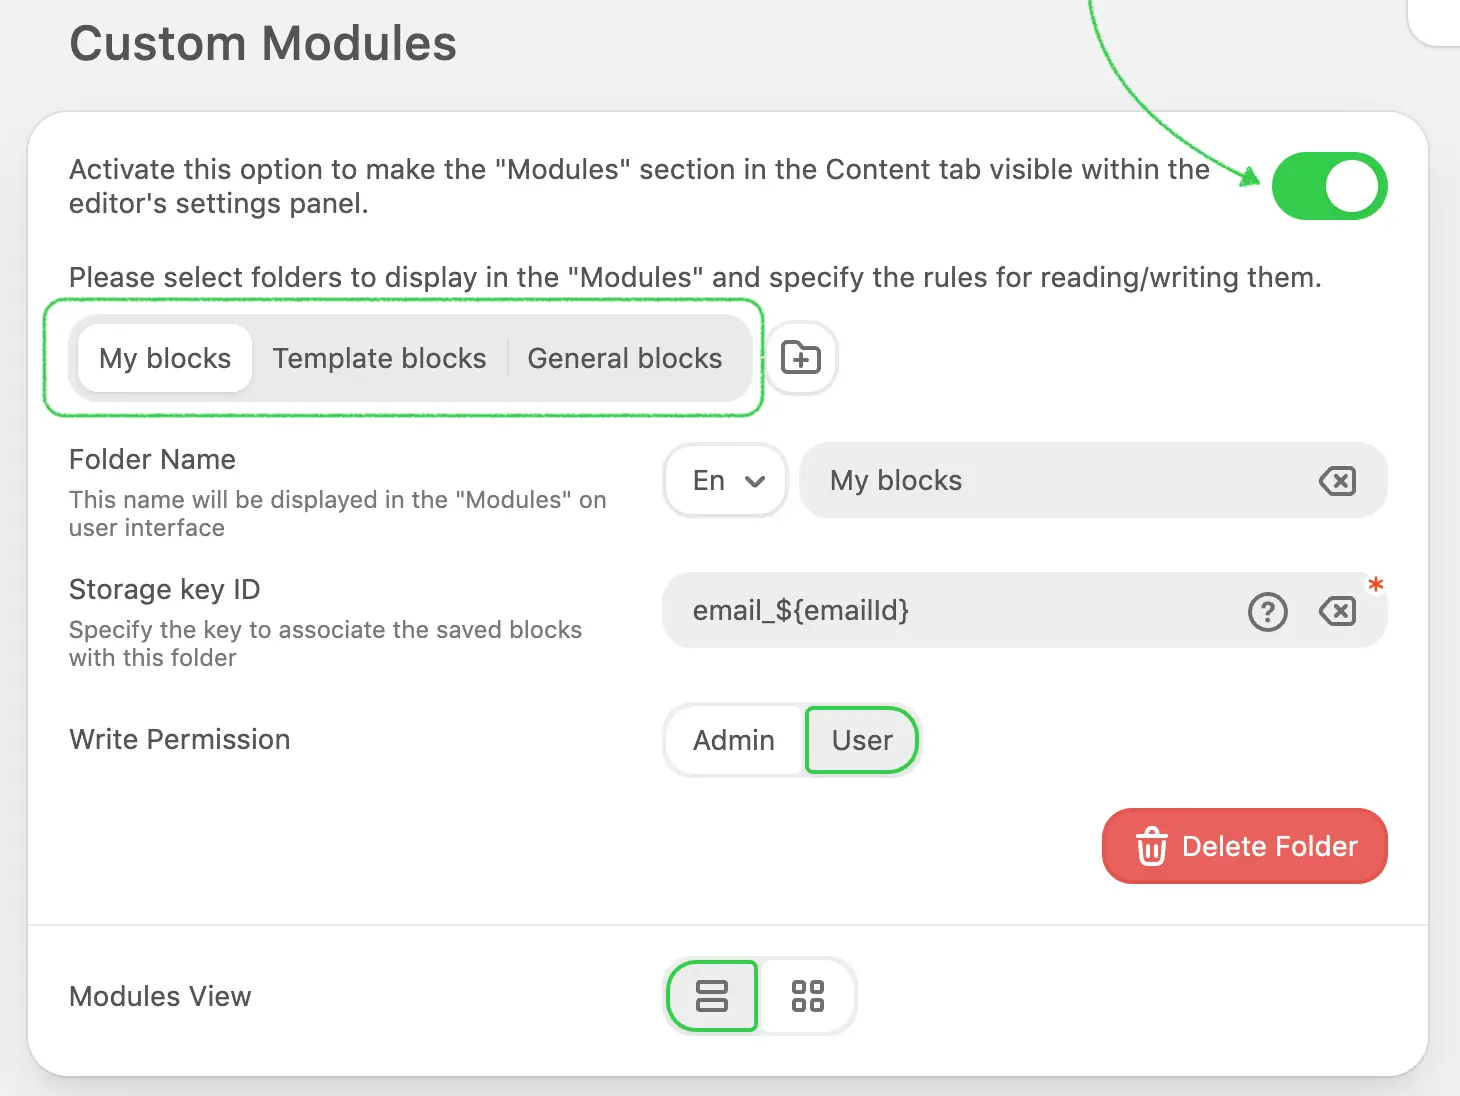
Before users can save and reuse modules, the feature must be activated in your Plugin configuration.
This is a global control that enables the Modules tab in the editor, allowing users to save new modules and access previously saved ones by default.
If you need to manage this functionality dynamically — for example, show or hide it for specific users or sessions — you can use the modulesDisabled parameter during initialization.
When modulesDisabled is set to true, the Modules tab will be hidden, and module saving will be unavailable for that particular session, even if the global control is enabled in the Plugin settings.
Setting Up Module Folders
Similar to the Image Gallery, users will see as many folders (tabs) in the Modules tab as you have configured for your Plugin application.
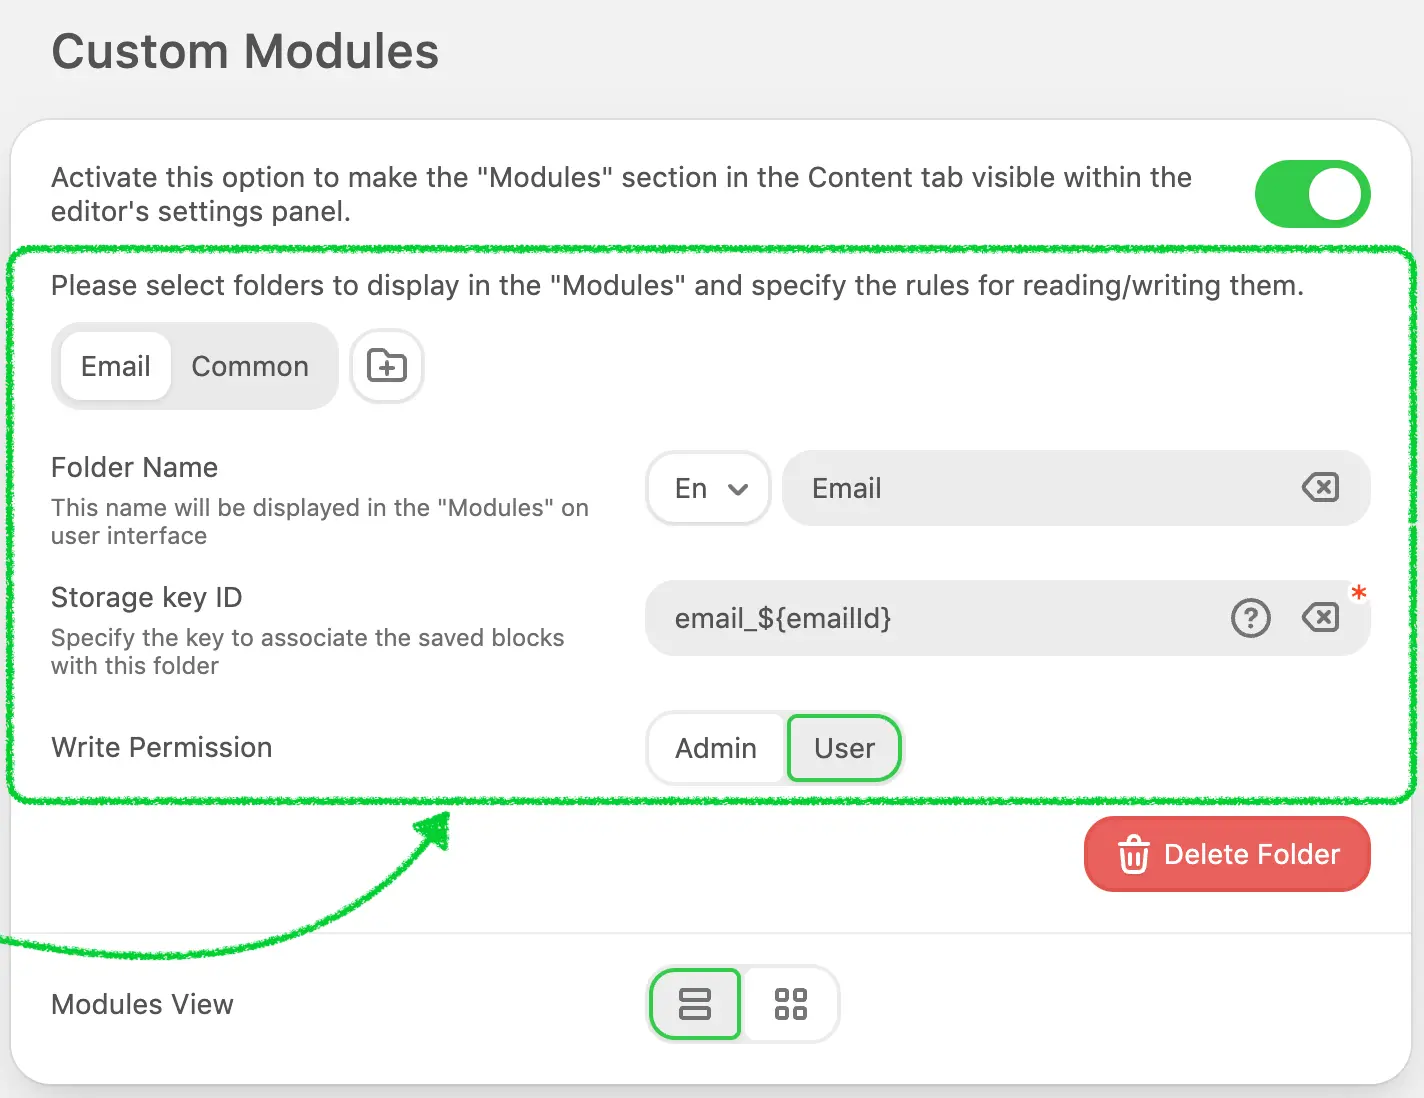
On the Plugin configuration page, you can manage the following settings:
- Number of folders: define how many folders you want to make available to users.
- Folder names: specify folder names in every supported language.
- Storage key ID: assign a unique identifier used to store and retrieve modules from the plugin’s database.
- Write permissions: define which user role has permission not only to view and use modules from this folder but also to create, edit, or delete them.
Please be advised:
- If you set the role for a folder to a user, but the plugin is initialized with a token generated for an admin role, the user will still be able to view and insert modules from that folder, but will not be able to modify, delete, or save new ones. Refer to the Authentication section for more details on role configuration.
- You can define the Storage Key ID as either a static value or a variable (use braces, for example,
${UserId}). This enables the dynamic separation of module storage for different users.
Example:
If you want each user to see only their own modules, you can create a folder named My Modules and set its path to${UserId}. When initializing the Plugin, pass the user’s ID (e.g.,00000) to themetadataparameter.
The Plugin will then load modules stored under the key00000from its database. If you initialize the Plugin with another user ID (e.g.,00001), previously saved modules from the first user will no longer be displayed for the new session.
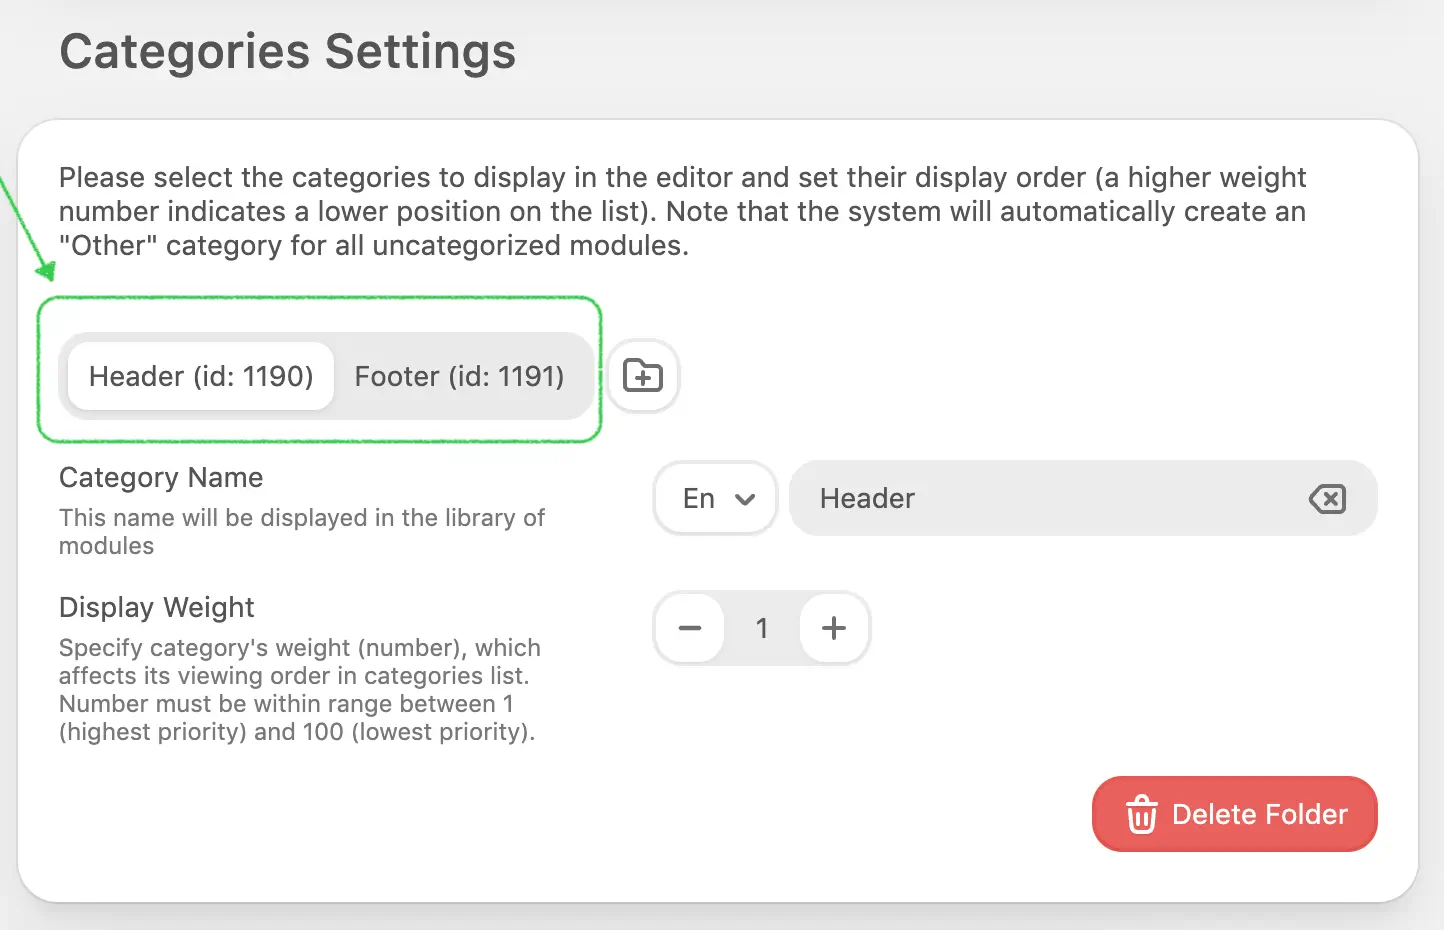
Configuring Module Categories
Each module can belong to a category, helping users organize and filter reusable elements more efficiently.
You can create any number of categories to group modules by theme, purpose, or department — for example, Headers, Footers, Promotions, or Transactional.

Once categories are configured, they will appear in two places within the Plugin interface:
- in the Modules tab, where users can filter saved modules;
- in the Save / Edit Module dialog, allowing users to assign a category when saving a new module.
To make the module library more focused and relevant to each user group, you can control which categories are visible for particular users.
Use the following parameter during plugin initialization:
"modulesExcludedCategories": [1, 2]
This parameter hides specific categories (by ID) from the modules list in the editor.
It’s useful when certain categories should remain internal or available only to specific roles or environments.
Synchronized Modules
Stripo allows creating Synchronized Modules — reusable blocks that update automatically across all templates where they are used.
When a synchronized module is updated, the changes are instantly reflected in all templates that contain it.
To learn more about synchronization logic and how to handle it programmatically, refer to: Synchronized Modules.
Module Save Validation
How It Works
In some cases, you may want to restrict users from saving or updating a module based on your own business logic — for example:
- when a module contains specific HTML code or content,
- when synchronization is enabled,
or when it fails validation in your external system.
This can be achieved using the validateModuleSave callback.
When defined, the editor calls this function each time a user clicks Save or Update in the module editor.
Usage
Add the validateModuleSave parameter to your plugin initialization:
js
{
  ...
  "validateModuleSave": function(data) {
    // Your validation logic here
    return { canSave: true };
  },
  ...
}
You can also define the validateModuleSave function as asynchronous, for example, when you need to perform validation through an external API or database check before allowing the module to be saved.
If the callback is not defined, the save process continues normally.
js
{
  ...
  "validateModuleSave": async function(data) {
    // Example: asynchronous check via external API
    // Allow saving
    return { canSave: true };
  },
  ...
}
Parameters
The callback receives a single argument, data, which is an object of type ModuleSaveValidationData.
This object contains all available information about the module.
| Parameter | Type | Description |
|---|---|---|
id | number (optional) | Unique ID of the module. Empty when creating a new one, populated when updating. |
name | string (optional) | Module name entered by the user. Empty when creating a new one, populated when updating. |
html | string | Full HTML code of the module, including all nested blocks. |
type | string | Type of module — STRIPE, STRUCTURE, or CONTAINER. |
isSynced | boolean (optional) | Indicates whether the module is synchronized. |
The editor always sends the entire module data object to the validateModuleSave callback.
You can use any of its fields for your validation logic — for example, analyze the HTML content, check the module type, or restrict updates to synchronized modules.
Return Value
The callback must return an object of the following structure:
| Property | Type | Description |
|---|---|---|
canSave | boolean | Determines whether saving is permitted. |
errorMessage | string (optional) | A message displayed in the UI when saving is blocked. |
If the callback returns:
{ canSave: true } → the module is saved as usual.
{ canSave: false, errorMessage: '...' } → saving is blocked, and the provided message is displayed in the UI.
If no callback is defined, the save process continues normally.
To display a custom message on UI when saving is blocked, ensure that your Plugin implementation supports notifications. Refer to the Notification Settings section for setup details.
Example of Synchronous Usage
js
{
  ...
  "validateModuleSave": function(data) {
    // Example: Restrict saving synchronized modules
    if (data.isSynced) {
      return {
        canSave: false,
        errorMessage: 'Synchronized modules cannot be updated manually.'
      };
    }

    // Allow saving all other modules
    return { canSave: true };
  },
  ...
}
Example of Asynchronous Usage
js
{
  ...
  "validateModuleSave": async function(data) {
    // Example: asynchronous check via external API
    const response = await fetch('https://api.example.com/validate-module', {
      method: 'POST',
      headers: { 'Content-Type': 'application/json' },
      body: JSON.stringify(data)
    });

    const result = await response.json();

    if (!result.isAllowed) {
      return {
        canSave: false,
        errorMessage: result.message || 'Module cannot be saved at this time.'
      };
    }

    // Allow saving
    return { canSave: true };
  },
  ...
}
If the callback returns a Promise, the editor waits for it to resolve before continuing the save process.
If the Promise resolves to { canSave: false }, saving is blocked and the message is shown in the editor.
If it resolves to { canSave: true }, the module is saved normally.
Module Save Preprocessing
How It Works
In some cases, you may want to modify a module right before it is saved or updated in the library — for example:
- to normalize or clean up HTML,
- to inject additional attributes or metadata,
- to apply transformations using TemplateModifier,
- or to ensure consistency with your external system.
This can be achieved using the onBeforeModuleSave callback.
When defined, the editor calls this function each time a user initiates:
- Save in the module panel,
- Update in the module panel,
- Update Module for synchronized modules.
The callback runs before the module is saved, allowing you to modify its content directly in the editor.
Usage
Add the onBeforeModuleSave parameter to your plugin initialization:
js
{
 ...
 "onBeforeModuleSave": function(data) {
   // Your preprocessing logic here
   return { canSave: true };
 },
 ...
}
This callback is:
- optional,
- synchronous,
- executed before the module is saved,
- independent from
validateModuleSave.
If the callback is not defined, the editor saves the module immediately using the current HTML from the template.
If onBeforeModuleSave is provided:
- The user clicks Save / Update / Update Module.
- The editor calls
onBeforeModuleSave. - The editor waits for the response.
- During this time, a loading indicator is shown on the button.
- As a plugin integrator, you can:
- modify the module using
TemplateModifier, - update the DOM directly inside the editor.
- modify the module using
- The callback returns a result:
{ canSave: true }→ proceed with saving,{ canSave: false, errorMessage: '...' }→ cancel saving and show message.
- If allowed:
- the editor retrieves the updated HTML from the template,
- the module is saved to the library.
⚠️ The saved HTML is always taken from the actual DOM after modifications, not from any previous snapshot.
Parameters
The callback receives a single argument data, which is an object of type ModuleSaveValidationData.
| Parameter | Type | Description |
|---|---|---|
id | number (optional) | Unique ID of the module. Empty when creating a new module. |
name | string | Module name entered by the user. |
html | string | Full HTML of the module at the moment of save. |
type | string | Module type — STRIPE, STRUCTURE, or CONTAINER. |
isSynced | boolean (optional) | Indicates whether the module is synchronized. |
moduleNode | ImmutableHtmlNode | Reference to the actual module node in the template. Can be used with TemplateModifier. |
Return Value
The callback must return an object of the following structure:
| Property | Type | Description |
|---|---|---|
canSave | boolean | Determines whether saving is allowed. |
errorMessage | string (optional) | Message displayed if saving is blocked. |
{ canSave: true }→ module is saved{ canSave: false, errorMessage: '...' }→ saving is blocked and message is shown
Example of Usage
js
{
 ...
 "onBeforeModuleSave": function (data) {
   console.log('[onBeforeModuleSave] called with:', data);

   const copilotApi = window.StripoEditorApi.editorCopilotApi;
   const modifier = copilotApi.getTemplateModifier();

   modifier
     .modifyHtml(data.moduleNode)
     .setAttribute('data-saved-at', new Date().toISOString())
     .apply({
       key: 'Set module save timestamp',
       params: {},
       getValue() {
         return { key: this.key, params: this.params };
       }
     });

   console.log('[onBeforeModuleSave] Set data-saved-at on module node');

   return { canSave: true };
 },
 ...
}
Module Delete Validation
How It Works
You can use the validateModuleDelete callback to verify whether a module can be deleted from the library before the action is confirmed.
This allows you to apply additional business rules — for example:
- preventing deletion of synchronized modules,
- restricting deletion for specific module types,
- or it fails validation in your external system.
When a user clicks Delete icon in the module library and confirms the action in the pop-up:
- The editor checks if the
validateModuleDeletecallback is defined. - If found, the editor calls this function and passes a complete data object describing the module (
id,name,html,type,isSynced). - While waiting for the callback response, a loading indicator appears on the confirmation button.
- When the callback resolves:
- if it returns
{ ok: true }, the module is deleted; - if it returns
{ ok: false, errorMessage: '...' }, the deletion is canceled and the message is shown in a notification.
- if it returns
- If the callback is not defined, the module is deleted immediately, following standard behavior.
Usage
Add the validateModuleDelete parameter to your plugin initialization:
js
{
  ...
  "validateModuleDelete": function(data) {
    // Your validation logic here
    return { ok: true };
  },
  ...
}
If the callback is not defined, the module will be deleted immediately after confirmation.
You can also define the function as asynchronous, for example, if your validation requires a server check or remote API call.
js
{
  ...
  "validateModuleDelete": async function(data) {
    // Example: simulate API request delay
    // Allow deletion

    return { ok: true };
  },
  ...
}
If the callback returns a Promise, the editor waits for it to resolve before proceeding with deletion.
Parameters
The function receives a single argument data, which is an object of type ModuleDeleteValidationData containing all available details about the module:
| Parameter | Type | Description |
|---|---|---|
id | number | Unique ID of the module. |
name | string | Module name entered by the user. |
html | string | Full HTML code of the module, including all nested blocks. |
type | string | Type of module — STRIPE, STRUCTURE, or CONTAINER. |
isSynced | boolean (optional) | Indicates whether the module is synchronized. |
Return Value
The function must return an object of type ModuleDeleteValidationResult:
| Property | Type | Description |
|---|---|---|
ok | boolean | Determines whether deletion is permitted. |
errorMessage | string (optional) | A message displayed in the UI when deletion is blocked. |
Example of a returned object:
json
{
  ok: false,
  errorMessage: 'Stripe modules cannot be deleted.'
}
To display a custom message on UI when deletion is blocked, ensure that your Plugin implementation supports notifications. Refer to the Notification Settings section for setup details.
Example of Synchronous Usage
js
{
  ...
  "validateModuleDelete": function(data) {
    // Example: restrict deletion of synchronized modules
    if (data.isSynced) {
      return {
        ok: false,
        errorMessage: 'Synchronized modules cannot be deleted.'
      };
    }

    // Allow deletion of all other modules
    return { ok: true };
  },
  ...
}
Example of Asynchronous Usage
js
{
  ...
  "validateModuleDelete": async function(data) {
    // Simulate a delay (e.g., API call)
    await new Promise(resolve => setTimeout(resolve, 2000));

    // Example: block deletion for "STRIPE" modules
    if (data.type === 'STRIPE') {
      return {
        ok: false,
        errorMessage: 'Stripe modules cannot be deleted.'
      };
    }

    // Allow deletion for all other types
    return { ok: true };
  },
  ...
}
If the callback returns a Promise, the editor will wait until it resolves before proceeding.
While waiting, a loading indicator appears on the confirmation button in the delete popup.