Appearance
Core Concepts
Immutability
The Philosophy Behind Immutability
Stripo Editor was designed from day one for multi-user, real-time editing. This enables efficient teamwork without conflicts or data loss. This collaboration model places specific requirements on the editor's architecture and on how an email template is modified. The system must:
- Distribute changes quickly and reliably to everyone participating in the session;
- Resolve conflicts correctly when multiple users edit the same part of a template at the same time;
- Track a full history of changes—who changed what and when.
Why raw HTML/CSS editing is disabled
To guarantee a consistent result for all users and preserve a verifiable change history, direct editing of HTML and CSS inside the editor is disabled. All modifications are expressed as patches—atomic operations that change structure or content. These patches are broadcast to all participants and applied using a CRDT (Conflict-free Replicated Data Type) algorithm adapted by the Stripo team for HTML/CSS. This ensures that every participant converges to the same state deterministically.
Data model in the Extensions SDK
To prevent accidental direct mutations of the template, the Extensions SDK does not expose the template as DOM elements (HTMLElement). Instead, it uses special, read-only ImmutableNode objects. ImmutableNode lets you inspect structure and properties, but it does not allow direct writes to the template.
javascript
// Traditional DOM (NOT supported in extensions)
const element = document.querySelector('.my-element');
element.style.color = 'red';           // ❌ Direct mutation
element.setAttribute('data-id', '123'); // ❌ Direct mutation
element.innerHTML = '<span>New</span>'; // ❌ Direct mutation

// Immutable Node System (REQUIRED in extensions)
const node = this.api.getDocumentRoot().querySelector('.my-element');
const color = node.getStyle('color');     // ✅ Reading is allowed
const id = node.getAttribute('data-id');  // ✅ Reading is allowed
const html = node.getInnerHTML();         // ✅ Reading is allowed
// node.style.color = 'red';              // ❌ This doesn't exist!
How to modify a template correctly
Templates are modified through the "Template Modification System" — a set of safe, editor-validated operations that automatically sync across all participants in a session. Use this system for any changes to an email's structure or content.
Components
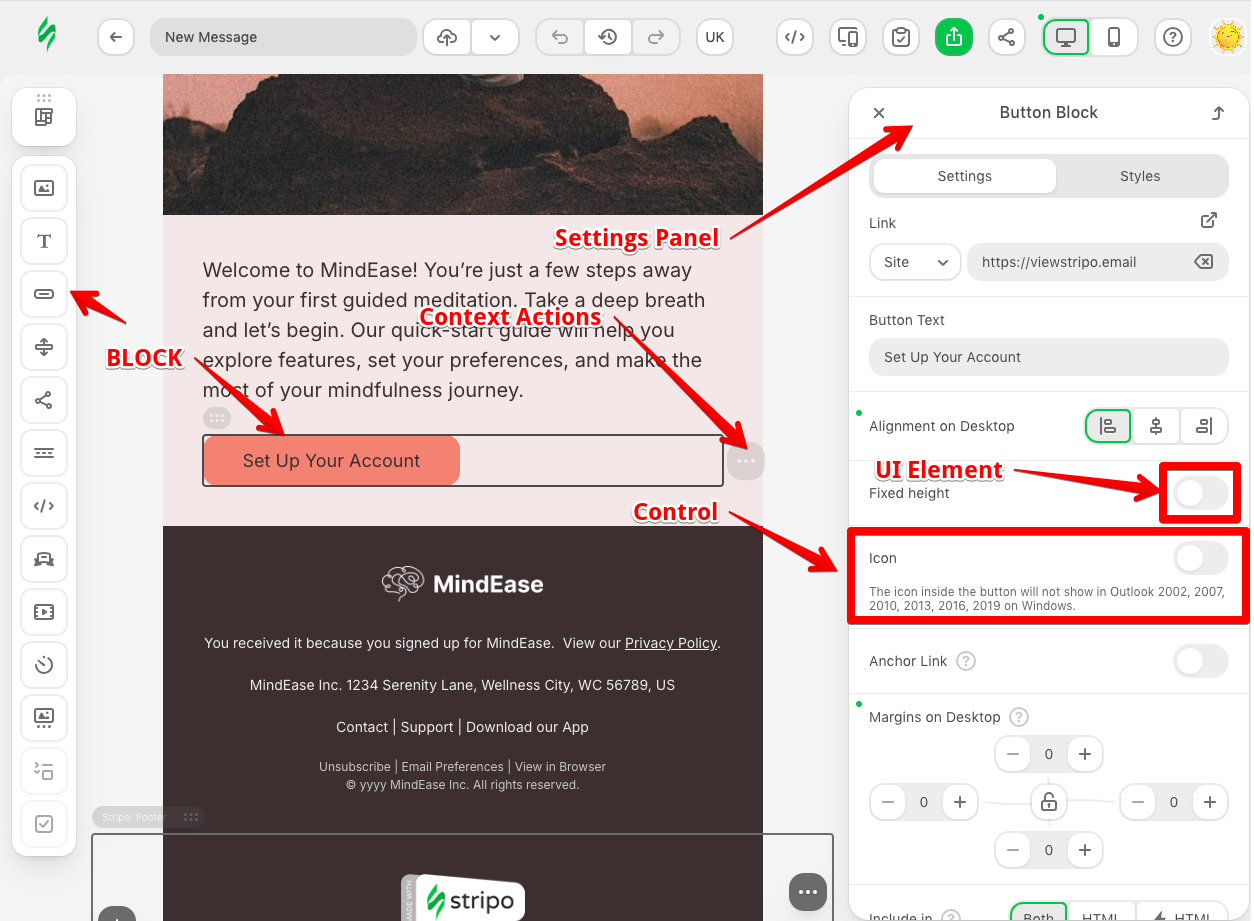
The extension system is built around several core components you can include in an extension. They are:
- Blocks: Custom content blocks that can be added to the editor
- UI Elements: Custom UI elements to extend the editor interface
- Controls: Form controls for settings panels
- Settings Panels: Panels for configuring blocks
- Context Actions: Actions that appear in block's context menus
- Tag Registry: Helps to override default UiElements with custom HTML tags
Lifecycle Cleanup
Starting from v3.7.0, extension components can implement a destroy() method to release resources when the editor is reinitialized or the extension is uninstalled.
Use destroy() to:
- Remove event listeners attached outside the template
- Clear timers or subscriptions
- Clean up DOM artifacts added to
document.body
Integration Points
Overview
The Stripo Extensions SDK provides extension points that allow you to override built-in editor functionality with your own implementations. Instead of using Stripo's default UI for common tasks like selecting images, videos, or managing dynamic content, you can integrate your own systems, libraries, and services directly into the editor workflow.
The SDK exposes the following interfaces for external service integration:
External Image Library
When to Use:
- You have an existing media library
- You need to enforce specific image selection rules
- You want to provide curated, brand-approved images
- You require custom metadata or tagging systems
Full Example Implementation: How to Integrate an External Image Library
API Reference: ExternalImageLibrary
New in v3.2.0
You can now create a custom tab within the build-in Stripo image library using ExternalImageLibraryTab to organize images from different sources (e.g., stock photos, brand assets, user uploads).
Custom tab can be registered independently without requiring a full ExternalImageLibrary implementation, making it easier to add image sources to the editor.
Full Example Implementation: How to Integrate an External Image Library Tab
API Reference: ExternalImageLibraryTab
External Video Library
When to Use:
- You host videos on your own platform
- You need to maintain a curated video library
Full Example Implementation: How to Integrate an External Video Library
API Reference: ExternalVideosLibrary
External Smart Elements Library
How It Works: Stripo handles the layout and rendering of Smart Elements, while your implementation controls what data gets inserted. By implementing the SDK's interface, you connect your data source without rebuilding the Smart Elements logic. You simply provide the data structure.
When to Use:
- You have a product catalog
- You need real-time or personalized content in emails
Full Example Implementation: How to Integrate an External Smart Elements Library
API Reference: ExternalSmartElementsLibrary
External AI Assistant
When to Use:
- You have specific AI service requirements or preferences
- You need to align AI output with brand guidelines
- You want to implement custom prompts or workflows
Full Example Implementation: How to Integrate an External AI Assistant
API Reference: ExternalAiAssistant
External Display Conditions Library
How It Works: Your implementation provides the UI and logic for defining conditions, while Stripo handles the rendering and export based on those conditions. By implementing the SDK's interface, you can maintain complex conditional logic in your own system.
When to Use:
- You have existing segmentation or personalization rules
- You need to sync conditions with external systems
- You want to provide user-friendly condition builders
- You require custom condition types beyond Stripo's defaults
Full Example Implementation: How to Integrate External Display Conditions
API Reference: ExternalDisplayConditionsLibrary
External Merge Tags Selector
How It Works: When the merge tags selector is clicked, the SDK invokes your implementation, allowing you to open a modal with your catalog of personalization variables. Once a user selects a tag, your implementation returns it via callback, and Stripo inserts it at the current cursor position.
When to Use:
- You have custom personalization fields in your system
- You want to provide account-specific or context-aware merge tags
- You require custom organization or categorization of variables
Full Example Implementation: How to Integrate External Merge Tags
External Custom Font
How It Works: A new Custom tab appears in the Font Family dropdown with a "+ Insert custom font" button. When clicked, the SDK invokes your implementation, allowing you to open a modal where users define the font name, CSS declaration, and URL. Once confirmed, your implementation returns the font parameters via callback, and the font becomes immediately available in the dropdown.
When to Use:
- You want to give users control over font selection
- You need to integrate with external font services
- You have brand-specific fonts that need to be dynamically loaded
Full Example Implementation: How to Integrate External Custom Font