Appearance
Create a Custom Coupon Block
Overview
The Coupon Block extension demonstrates how to create a custom content block for the Stripo Email Editor. This tutorial walks you through building a reusable coupon code block with customizable styling options, including font family, size, and color controls.
What You'll Build
In this tutorial, you'll create a fully functional custom block that:
- Displays a coupon code with a placeholder for dynamic content {{COUPON_CODE}}
- Provides a custom icon for the blocks panel
- Includes styling controls in the settings panel (font family, size, and color)
- Supports internationalization for multi-language editors
- Integrates seamlessly with the Stripo editor's existing UI
Use Cases
- E-commerce Promotions: Add discount codes to promotional email campaigns
- Loyalty Programs: Display member-exclusive coupon codes
- Seasonal Sales: Highlight special offer codes in marketing emails
- Personalized Offers: Use merge tags to show customer-specific discount codes
Prerequisites
Before starting this tutorial, ensure you have:
- Node.js version 22.x or higher installed
- Basic understanding of JavaScript ES6+ syntax
- Familiarity with the Stripo Extensions SDK
- A text editor or IDE for code development
Understanding the Components
A complete custom block extension consists of several key components:
1. Block Definition
The core Block class that defines the block's structure, appearance, and behavior.
2. Settings Panel Registry
Configuration that determines which controls appear in the settings panel when the block is selected.
3. Custom Controls
Reusable control components that allow users to modify block properties (font, color, size, etc.).
4. Icon Registry
Custom SVG icons that appear in the blocks panel for visual identification.
5. Internationalization
Translation files that support multiple languages in the editor interface.
Step 1: Project Setup
Create your project structure and install dependencies according to the Getting Started guide.
Your project directory structure should look like this:
bash
coupon-block/
├── index.html
├── src/
│   ├── creds.js
│   ├── index.js
│   └── extension.js
├── package.json
└── vite.config.js
Step 2: Create the Coupon Block Class
Create a new file src/CouponBlock.js with the following block definition:
javascript
import {Block, BlockType} from '@stripoinc/ui-editor-extensions';
/**
* Coupon Block Component
* A custom block for displaying coupon codes in email templates
*/
export class CouponBlock extends Block {
/**
* Returns the unique identifier for this block
* This ID is used to register the block and reference it in settings
* @returns {string} Unique block identifier
*/
getId() {
return 'coupon-block';
}
/**
* Returns the icon identifier for the blocks panel
* This icon appears in the blocks library for users to drag and drop
* @returns {string} Icon identifier registered in IconsRegistry
*/
getIcon() {
return 'couponBlockIcon';
}
/**
* Returns the display name shown in the blocks panel
* Uses the translation API for internationalization support
* @returns {string} Translated block name
*/
getName() {
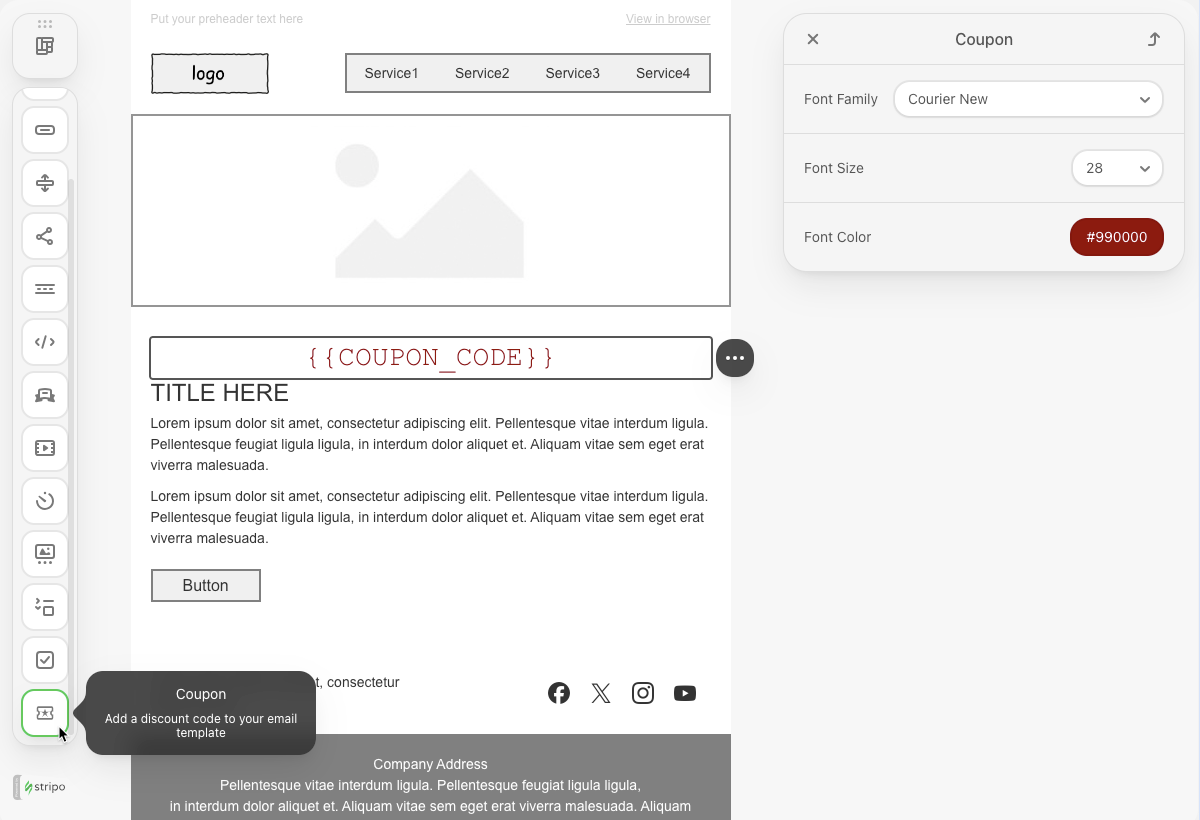
return this.api.translate('Coupon');
}
/**
* Returns the description shown in the blocks panel
* Provides users with information about the block's purpose
* @returns {string} Translated block description
*/
getDescription() {
return this.api.translate('Add a discount code to your email template');
}
/**
* Returns the HTML template structure for this block
* The template defines the initial markup when the block is inserted
* @returns {string} HTML template with merge tag placeholder
*/
getTemplate() {
return `
<td>
<table width="100%" cellspacing="0" cellpadding="0">
<${BlockType.BLOCK_TEXT} align="center">
<p>{{COUPON_CODE}}</p>
</${BlockType.BLOCK_TEXT}>
</table>
</td>`
}
}Key Components Explained
getId(): Returns a unique identifier for the block. This ID is used throughout the extension system to reference the block in settings panels, event handlers, and registries.
getIcon(): Specifies which icon to display in the blocks panel. The icon identifier must match a key registered in the
IconsRegistry.getName(): Provides the user-facing name displayed in the blocks panel. Uses
this.api.translate()for internationalization support.getDescription(): Offers a brief description of the block's purpose, helping users understand when to use it.
getTemplate(): Specifies the HTML structure inserted when users add the block to their email. In this implementation,
BlockType.BLOCK_TEXTis placed inside<td>and<table>elements, rather than as a root node. Because of this, users cannot directly select or edit this text region usingBlockCompositionType.BLOCK, which also restricts free-form editing of the coupon code area.
Merge Tags
Merge tags like {{COUPON_CODE}} can be replaced with actual values when generating the final email.
Step 3: Register Custom Icons
Create the icon registry to provide custom icons for your blocks.
Create Icon Registry
Create src/icons/ExtensionIconsRegistry.js:
javascript
import {IconsRegistry} from '@stripoinc/ui-editor-extensions';
import couponBlockIcon from './coupon.svg?raw';

/**
 * Extension Icons Registry
 * Registers custom SVG icons for use in the extension
 */
export class ExtensionIconsRegistry extends IconsRegistry {
    /**
     * Registers SVG icons by adding them to the icons map
     * @param {Object} iconsMap - Map of icon identifiers to SVG strings
     */
    registerIconsSvg(iconsMap) {
        iconsMap['couponBlockIcon'] = couponBlockIcon;
    }
}
Add SVG Icon
Create src/icons/coupon.svg:
svg
<svg xmlns="http://www.w3.org/2000/svg" height="24px" viewBox="0 -960 960 960" width="24px" fill="#CCCCCC">
    <path d="m368-320 112-84 110 84-42-136 112-88H524l-44-136-44 136H300l110 88-42 136ZM160-160q-33 0-56.5-23.5T80-240v-135q0-11 7-19t18-10q24-8 39.5-29t15.5-47q0-26-15.5-47T105-556q-11-2-18-10t-7-19v-135q0-33 23.5-56.5T160-800h640q33 0 56.5 23.5T880-720v135q0 11-7 19t-18 10q-24 8-39.5 29T800-480q0 26 15.5 47t39.5 29q11 2 18 10t7 19v135q0 33-23.5 56.5T800-160H160Zm0-80h640v-102q-37-22-58.5-58.5T720-480q0-43 21.5-79.5T800-618v-102H160v102q37 22 58.5 58.5T240-480q0 43-21.5 79.5T160-342v102Zm320-240Z"/>
</svg>
Custom Icons
You can use any SVG icon you prefer. The ?raw import suffix in Vite tells the bundler to import the SVG file as a string rather than a URL, which is required for the IconsRegistry.
Step 4: Create Custom Controls
Stripo provides a wide variety of built-in control classes for common styling needs, which you can use directly without implementing them from scratch. In this section, we'll utilize three such built-in controls to easily add styling to our coupon block:
Font Color Control
Create src/settings/controls/CouponFontColorControl.js:
javascript
import {TextColorBuiltInControl} from '@stripoinc/ui-editor-extensions';

export const COUPON_FONT_COLOR_CONTROL_ID = 'coupon-font-color-control';

/**
 * Coupon Font Color Control
 * Extends the built-in text color control for changing coupon text color
 */
export class CouponFontColorControl extends TextColorBuiltInControl {
    /**
     * Returns the unique identifier for this control
     * @returns {string} Control identifier
     */
    getId() {
        return COUPON_FONT_COLOR_CONTROL_ID;
    }
}
Font Size Control
Create src/settings/controls/CouponFontSizeControl.js:
javascript
import {TextSizeBuiltInControl} from '@stripoinc/ui-editor-extensions';

export const COUPON_FONT_SIZE_CONTROL_ID = 'coupon-font-size-control';

/**
 * Coupon Font Size Control
 * Extends the built-in text size control for changing coupon text size
 */
export class CouponFontSizeControl extends TextSizeBuiltInControl {
    /**
     * Returns the unique identifier for this control
     * @returns {string} Control identifier
     */
    getId() {
        return COUPON_FONT_SIZE_CONTROL_ID;
    }
}
Font Family Control
Create src/settings/controls/CouponFontFamilyControl.js:
javascript
import {TextFontFamilyBuiltInControl} from '@stripoinc/ui-editor-extensions';

export const COUPON_FONT_FAMILY_CONTROL_ID = 'coupon-font-family-control';

/**
 * Coupon Font Family Control
 * Extends the built-in font family control for changing coupon text font
 */
export class CouponFontFamilyControl extends TextFontFamilyBuiltInControl {
    /**
     * Returns the unique identifier for this control
     * @returns {string} Control identifier
     */
    getId() {
        return COUPON_FONT_FAMILY_CONTROL_ID;
    }
}
Step 5: Configure Settings Panel
The settings panel registry determines which controls appear when users select your custom block.
Create src/settings/ExtensionSettingsPanelRegistry.js:
javascript
import {SettingsPanelRegistry, SettingsPanelTab, SettingsTab} from '@stripoinc/ui-editor-extensions';
import {COUPON_FONT_COLOR_CONTROL_ID} from './controls/CouponFontColorControl';
import {COUPON_FONT_SIZE_CONTROL_ID} from './controls/CouponFontSizeControl';
import {COUPON_FONT_FAMILY_CONTROL_ID} from './controls/CouponFontFamilyControl';

/**
 * Extension Settings Panel Registry
 * Configures which controls appear in the settings panel for each custom block
 */
export class ExtensionSettingsPanelRegistry extends SettingsPanelRegistry {

    /**
     * Registers controls for custom blocks
     * @param {Object} controls - Map of block IDs to control configurations
     */
    registerBlockControls(controls) {
        // Register controls for the coupon block
        controls['coupon-block'] = [
            // Create a tab in the Styles section
            new SettingsPanelTab(
                SettingsTab.STYLES, // Built-in tab identifier
                [
                    // List of control IDs to display in this tab
                    COUPON_FONT_FAMILY_CONTROL_ID,
                    COUPON_FONT_SIZE_CONTROL_ID,
                    COUPON_FONT_COLOR_CONTROL_ID
               ]
            )
        ]
    }
}
Step 6: Add Internationalization
Create translation files to support multiple languages in the editor interface.
Create src/i18n/en.js:
javascript
/**
 * English translations for the Coupon Block extension
 * Keys are used in this.api.translate() calls throughout the extension
 */
export default {
    "Coupon": "Coupon",
    "Add a discount code to your email template": "Add a discount code to your email template",
}
Adding More Languages
To support additional languages, create more translation files:
javascript
// src/i18n/es.js - Spanish translations
export default {
    "Coupon": "Cupón",
    "Add a discount code to your email template": "Añade un código de descuento a tu plantilla de correo",
}

// src/i18n/fr.js - French translations
export default {
    "Coupon": "Coupon",
    "Add a discount code to your email template": "Ajoutez un code de réduction à votre modèle d'e-mail",
}
Step 7: Register the Extension
Create src/extension.js to assemble all components and register the extension:
javascript
import { ExtensionBuilder } from '@stripoinc/ui-editor-extensions';
import {ExtensionIconsRegistry} from './icons/ExtensionIconsRegistry';
import {CouponBlock} from './CouponBlock';
import en from './i18n/en';
import es from './i18n/es';
import fr from './i18n/fr';
import {ExtensionSettingsPanelRegistry} from './settings/ExtensionSettingsPanelRegistry';
import {CouponFontColorControl} from './settings/controls/CouponFontColorControl';
import {CouponFontSizeControl} from './settings/controls/CouponFontSizeControl';
import {CouponFontFamilyControl} from './settings/controls/CouponFontFamilyControl';

/**
 * Coupon Block Extension
 * Combines all extension components into a single extension package
 */
const extension = new ExtensionBuilder()
    // Register custom icons
    .withIconsRegistry(ExtensionIconsRegistry)

    // Register localization files
    .withLocalization({
        'en': en,
        'es': es,
        'fr': fr,
    })

    // Register settings panel configuration
    .withSettingsPanelRegistry(ExtensionSettingsPanelRegistry)

    // Register custom controls
    .addControl(CouponFontColorControl)
    .addControl(CouponFontSizeControl)
    .addControl(CouponFontFamilyControl)

    // Register custom blocks
    .addBlock(CouponBlock)

    // Build the final extension object
    .build();

export default extension;
Step 8: Run the Development Server
Your coupon block extension is now ready for testing.
Start the Development Server
bash
npm run devThis command will:
- Start the Vite development server on
http://localhost:3000 - Automatically open your default browser
- Load the Stripo editor with your coupon block extension
Complete Example
For a full working example with all source files, check out the complete implementation in our GitHub repository.