Appearance
Integrate an External AI Assistant
Overview
The External AI Assistant integration enables users to enhance and transform text content using AI-powered suggestions directly within the Stripo Email Editor. This integration provides a seamless experience for improving email copy with various text transformations including tone adjustment, length modification, and professional formatting.
What You'll Build
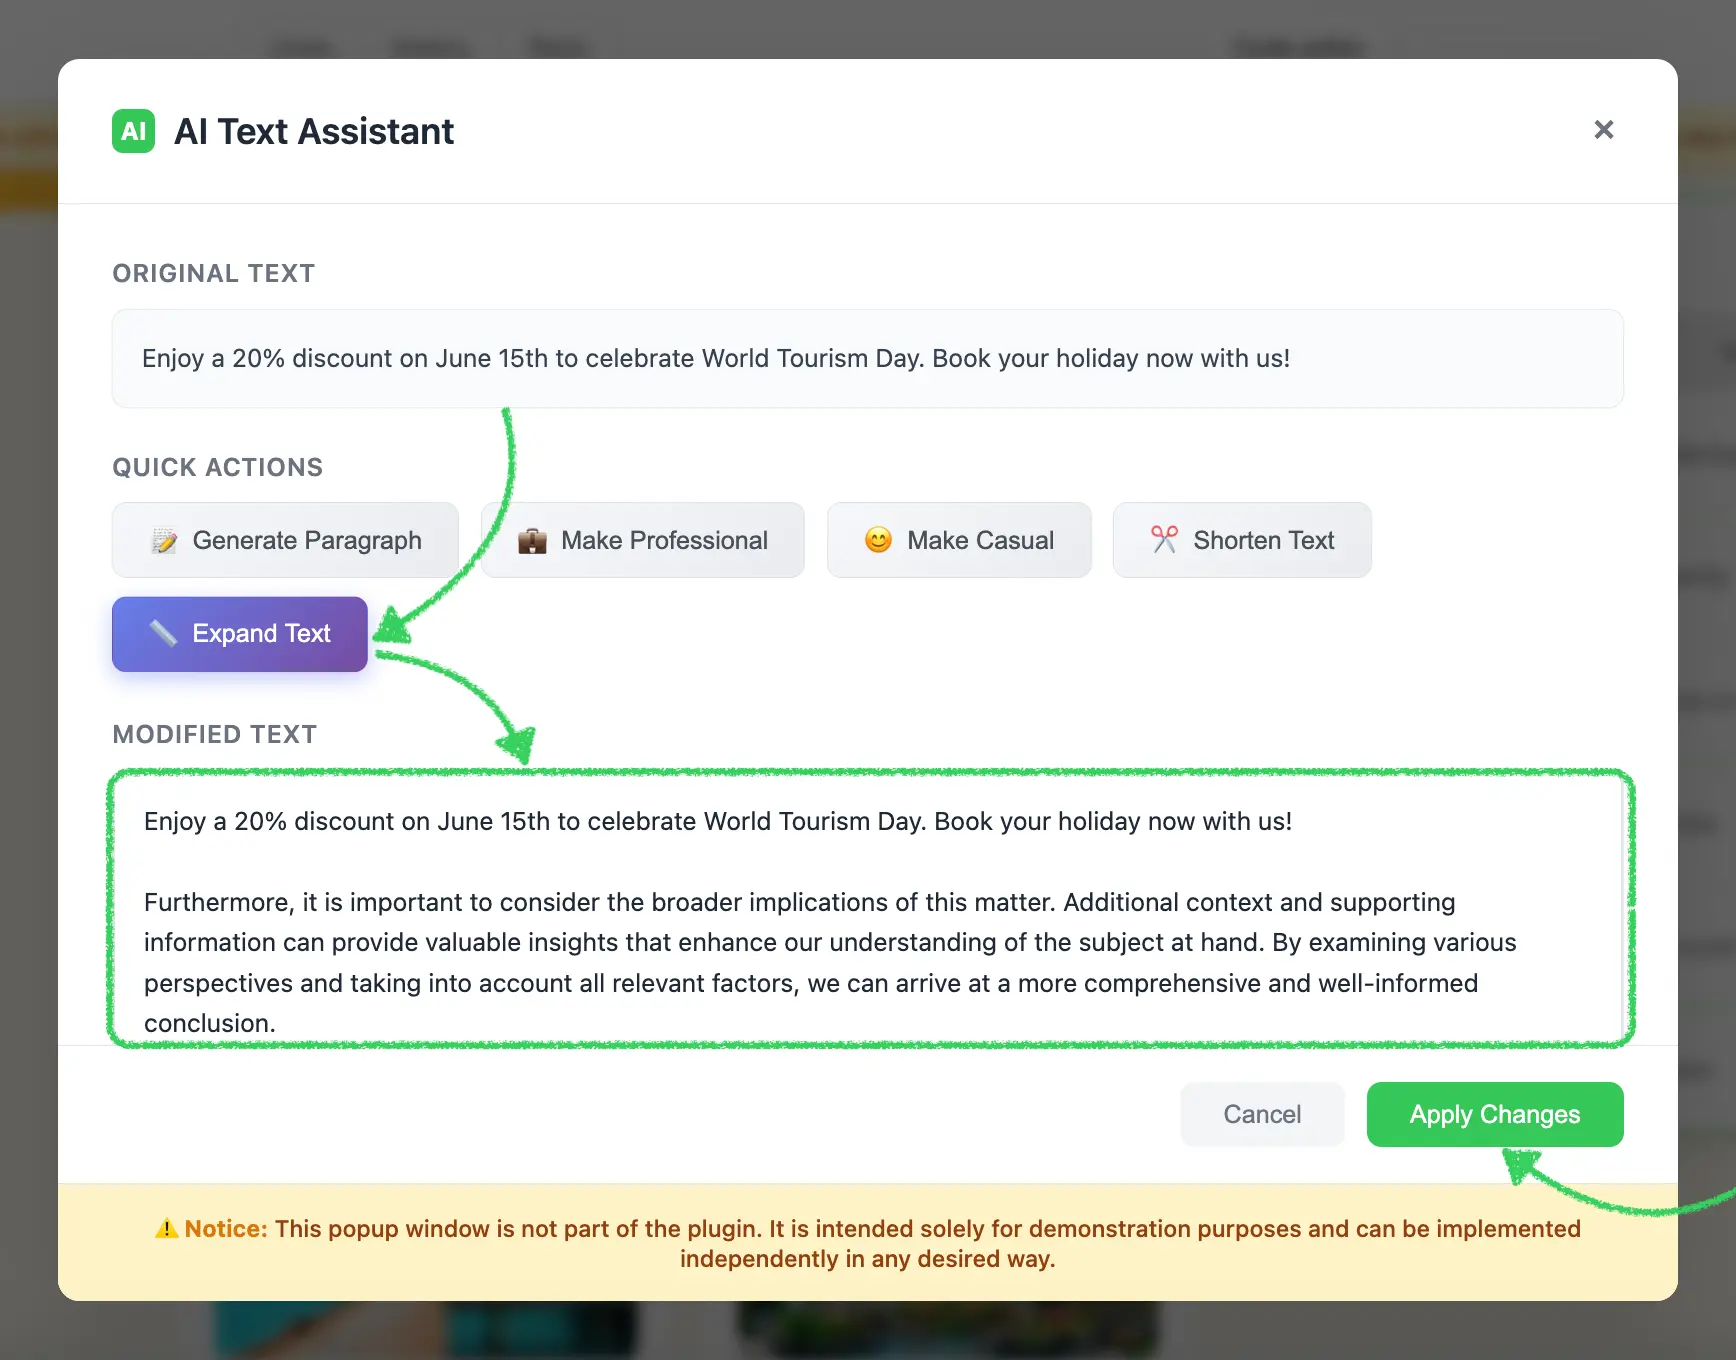
In this tutorial, you'll create a fully functional AI assistant modal that:
- Displays the original text content for reference
- Provides quick action buttons for common text transformations
- Includes an editable text area for manual adjustments
- Supports multiple transformation types (professional, casual, expand, shorten, generate)
- Handles text selection with proper callback integration
- Returns transformed text in the format expected by the Stripo editor


Use Cases
- Content Enhancement: Improve email copy with AI-powered suggestions
- Tone Adjustment: Transform text between professional and casual tones
- Length Optimization: Expand or shorten content to fit design requirements
- Content Generation: Generate new paragraphs when starting from scratch
- Multi-language Support: Connect to translation APIs for internationalization
- Brand Voice: Ensure consistent brand voice across email campaigns
- A/B Testing: Generate variations of content for testing
Prerequisites
Before starting this tutorial, ensure you have:
- Node.js version 22.x or higher installed
- Basic understanding of JavaScript ES6+ syntax
- Familiarity with the Stripo Extensions SDK
Understanding the Interface
The ExternalAiAssistant class must implement a single method:
typescript
openAiAssistant({
  value: string,
  onDataSelectCallback: (transformedText: string) => void,
  onCancelCallback: () => void
}): void
Parameters
| Parameter | Type | Description |
|---|---|---|
value | string | The original text content to enhance or transform |
onDataSelectCallback | Function | Callback function invoked when user applies transformed text |
onCancelCallback | Function | Callback function invoked when user cancels the operation |
Return Value
When a user applies transformed text, your assistant implementation must invoke the callback with a string containing the enhanced text:
javascript
onDataSelectCallback(textarea.value);Step 1: Project Setup
Create your project structure and install dependencies according to the Getting Started guide.
Your project directory structure should look like this:
bash
external-ai-assistant/
├── index.html
├── src/
│   ├── creds.js
│   ├── index.js
│   ├── extension.js
├── package.json
└── vite.config.js
Step 2: Create the AI Assistant Class
Create a new file src/MyExternalAiAssistant.js with the following basic class structure:
javascript
import {ExternalAiAssistant} from '@stripoinc/ui-editor-extensions';

/**
 * External AI Assistant Implementation
 * This class implements a modal AI text assistant with various text transformation capabilities
 * for the Stripo Email Editor extension system.
 */
export class MyExternalAiAssistant extends ExternalAiAssistant {
    // Instance properties
    externalAiAssistant;
    dataSelectCallback = () => {};
    cancelCallback = () => {};
    originalText = '';

    constructor() {
        super();
        this.createModal();
        this.attachEventListeners();
    }

    /**
     * Required method called by the Stripo editor
     * Opens the AI assistant modal dialog
     * @param {Object} params - Parameters object
     * @param {string} params.value - The text to work with
     * @param {Function} params.onDataSelectCallback - Callback when text is selected
     * @param {Function} params.onCancelCallback - Callback when modal is cancelled
     */
    openAiAssistant({value, onDataSelectCallback, onCancelCallback}) {
        // Store callbacks
        this.dataSelectCallback = onDataSelectCallback;
        this.cancelCallback = onCancelCallback;
        this.originalText = value || '';

        // Display original text
        const originalTextDiv = this.externalAiAssistant.querySelector('#originalText');
        originalTextDiv.textContent = this.originalText || 'No text provided';

        // Set the textarea value
        this.externalAiAssistant.querySelector('#text').value = this.originalText;

        // Show modal
        this.externalAiAssistant.style.display = 'flex';
    }
}
Key Components Explained
Instance Properties:
externalAiAssistant: Reference to the modal DOM elementdataSelectCallback: Stores the success callback from the Stripo editorcancelCallback: Stores the cancel callback from the Stripo editororiginalText: Stores the original text for reference and transformations
Constructor: Initializes the complete modal UI when the class is instantiated
openAiAssistant: Required method that:
- Stores the callbacks for later invocation
- Displays the original text in a read-only section
- Pre-fills the editable textarea with the original text
- Shows the modal dialog
Step 3: Define Text Transformations and Styles
Add static properties for transformation logic and UI configuration. Continue editing src/MyExternalAiAssistant.js:
javascript
export class MyExternalAiAssistant extends ExternalAiAssistant {
    // ... existing properties ...

    // UI Style configurations
    static STYLES = {
        // Modal overlay styles
        overlay: {
            backgroundColor: 'rgba(0, 0, 0, 0.6)',
            backdropFilter: 'blur(4px)',
            position: 'fixed',
            top: '0',
            right: '0',
            bottom: '0',
            left: '0',
            zIndex: '1050',
            fontFamily: "-apple-system, BlinkMacSystemFont, 'Segoe UI', Roboto, 'Helvetica Neue', Arial, sans-serif",
            display: 'flex',
            alignItems: 'center',
            justifyContent: 'center',
            padding: '20px'
        },

        // Modal container styles
        modal: {
            background: '#ffffff',
            borderRadius: '12px',
            boxShadow: '0 20px 60px rgba(0, 0, 0, 0.15)',
            maxWidth: '900px',
            width: '100%',
            maxHeight: '90vh',
            display: 'flex',
            flexDirection: 'column'
        },

        // Header styles
        header: {
            padding: '24px 30px',
            borderBottom: '1px solid #e5e7eb',
            display: 'flex',
            alignItems: 'center',
            justifyContent: 'space-between'
        },

        // Body styles
        body: {
            padding: '30px',
            overflowY: 'auto',
            flex: '1'
        },

        // Footer styles
        footer: {
            padding: '20px 30px',
            borderTop: '1px solid #e5e7eb',
            display: 'flex',
            justifyContent: 'flex-end',
            gap: '12px'
        },

        // Button styles
        suggestionButton: {
            background: 'linear-gradient(135deg, #f5f7fa 0%, #e9ecef 100%)',
            border: '1px solid #dee2e6',
            borderRadius: '8px',
            padding: '10px 20px',
            fontSize: '14px',
            fontWeight: '500',
            color: '#495057',
            cursor: 'pointer',
            transition: 'all 0.3s ease',
            display: 'flex',
            alignItems: 'center',
            gap: '8px'
        },

        primaryButton: {
            backgroundColor: '#34c759',
            color: 'white',
            padding: '10px 24px',
            borderRadius: '8px',
            fontSize: '14px',
            fontWeight: '500',
            border: 'none',
            cursor: 'pointer',
            transition: 'all 0.3s ease'
        },

        cancelButton: {
            backgroundColor: '#f3f4f6',
            color: '#6b7280',
            padding: '10px 24px',
            borderRadius: '8px',
            fontSize: '14px',
            fontWeight: '500',
            border: 'none',
            cursor: 'pointer',
            transition: 'all 0.3s ease'
        },

        // Disclaimer footer styles
        disclaimerFooter: {
            padding: '16px 30px',
            borderTop: '1px solid #e5e7eb',
            backgroundColor: '#fef3c7',
            borderRadius: '0 0 12px 12px',
            textAlign: 'center'
        }
    };

    // Text transformation templates
    static TEXT_TRANSFORMATIONS = {
        paragraph: {
            icon: '📝',
            label: 'Generate Paragraph',
            transform: () => "Lorem ipsum dolor sit amet, consectetur adipiscing elit. Sed do eiusmod tempor incididunt ut labore et dolore magna aliqua. Ut enim ad minim veniam, quis nostrud exercitation ullamco laboris nisi ut aliquip ex ea commodo consequat. Duis aute irure dolor in reprehenderit in voluptate velit esse cillum dolore eu fugiat nulla pariatur. Excepteur sint occaecat cupidatat non proident, sunt in culpa qui officia deserunt mollit anim id est laborum."
        },
        professional: {
            icon: '💼',
            label: 'Make Professional',
            transform: (text) => text ?
                `Dear valued recipient,\n\nI hope this message finds you well. ${text}\n\nPlease do not hesitate to contact me if you require any further information or clarification.\n\nBest regards` :
                "Dear valued recipient,\n\nI hope this message finds you well. I am writing to bring to your attention a matter of significant importance that requires your immediate consideration.\n\nPlease do not hesitate to contact me if you require any further information or clarification.\n\nBest regards"
        },
        casual: {
            icon: '😊',
            label: 'Make Casual',
            transform: (text) => text ?
                `Hey there! 👋\n\n${text}\n\nLet me know if you need anything else!\n\nCheers!` :
                "Hey there! 👋\n\nJust wanted to drop you a quick message. Hope everything's going great on your end!\n\nLet me know if you need anything else!\n\nCheers!"
        },
        shorten: {
            icon: '✂️',
            label: 'Shorten Text',
            transform: (text) => text && text.length > 50 ?
                text.substring(0, Math.min(text.length / 2, 100)) + "..." :
                "Brief and concise message."
        },
        expand: {
            icon: '📏',
            label: 'Expand Text',
            transform: (text) => text ?
                `${text}\n\nFurthermore, it is important to consider the broader implications of this matter. Additional context and supporting information can provide valuable insights that enhance our understanding of the subject at hand. By examining various perspectives and taking into account all relevant factors, we can arrive at a more comprehensive and well-informed conclusion.` :
                "This is an expanded version of the text with additional details, context, and supporting information. It provides a more comprehensive view of the subject matter, exploring various aspects and implications that might not have been immediately apparent in the original version."
        }
    };

    // ... rest of the class ...
}
Transformation Object Properties
Each transformation in TEXT_TRANSFORMATIONS contains:
| Property | Type | Description |
|---|---|---|
icon | string | Emoji icon displayed on the button |
label | string | Button label text |
transform | Function | Transformation function that takes original text and returns transformed text |
Production Implementation
In production environments, replace the static transformation functions with actual API calls to AI services like OpenAI, Anthropic Claude, or your custom AI backend.
Step 4: Build the Modal UI Structure
Implement the core modal creation methods. These methods generate the modal HTML structure and inject it into the page.
Create Modal Method
javascript
/**
 * Creates the modal HTML structure and appends it to the document body
 */
createModal() {
    const modalHtml = this.generateModalHTML();
    const container = document.createElement('div');
    container.innerHTML = modalHtml;
    document.body.appendChild(container);

    // Store reference to the modal element
    this.externalAiAssistant = document.getElementById('externalAiAssistant');
    // Initially hide the modal
    this.externalAiAssistant.style.display = 'none';
}

/**
 * Generates the complete modal HTML structure
 * @returns {string} Complete HTML string for the modal
 */
generateModalHTML() {
    return `
        <div id="externalAiAssistant" style="${this.styleObjToString(MyExternalAiAssistant.STYLES.overlay)}">
            <div style="${this.styleObjToString(MyExternalAiAssistant.STYLES.modal)}">
                ${this.generateHeaderHTML()}
                ${this.generateBodyHTML()}
                ${this.generateFooterHTML()}
                ${this.generateDisclaimerFooterHTML()}
            </div>
        </div>
    `;
}
Style Conversion Helper
Add the following utility method that converts JavaScript style objects to inline CSS strings:
javascript
/**
 * Converts a style object to an inline style string
 * @param {Object} styleObj - Style object with camelCase properties
 * @returns {string} Inline CSS style string with kebab-case properties
 */
styleObjToString(styleObj) {
    return Object.entries(styleObj)
        .map(([key, value]) => {
            // Convert camelCase to kebab-case
            const kebabKey = key.replace(/([A-Z])/g, '-$1').toLowerCase();
            return `${kebabKey}: ${value}`;
        })
        .join('; ');
}
Important
The styleObjToString() method is essential for converting the STYLES object into inline CSS strings. This method is required for proper modal rendering.
Modal Structure Overview
The modal consists of four main sections:
- Header: Title with AI icon and close button
- Body: Original text display, action buttons, and text editor
- Footer: Cancel and Apply buttons
- Disclaimer Footer: Informational notice
Step 5: Generate Header with Branding
Create the header section with AI branding and close button.
Header HTML Generator
javascript
/**
 * Generates the modal header section HTML
 * @returns {string} HTML string for the header section
 */
generateHeaderHTML() {
    return `
        <div style="${this.styleObjToString(MyExternalAiAssistant.STYLES.header)}">
            <h2 style="margin: 0; font-size: 20px; font-weight: 600; color: #1f2937; display: flex; align-items: center; gap: 10px;">
                <div style="width: 24px; height: 24px; background-color: #34c759;
                            border-radius: 6px; display: flex; align-items: center; justify-content: center;
                            color: white; font-weight: bold; font-size: 14px;">
                    AI
                </div>
                AI Text Assistant
            </h2>
            ${this.generateCloseButton()}
        </div>
    `;
}
Close Button Generator
javascript
/**
* Generates close button HTML with hover effects
* @returns {string} HTML string for the close button
*/
generateCloseButton() {
return `
<button class="close" type="button"
style="cursor: pointer; background: transparent; border: none; font-size: 24px;
color: #6b7280; padding: 4px; border-radius: 6px; transition: all 0.2s; line-height: 1;"
onmouseover="this.style.backgroundColor='#f3f4f6'; this.style.color='#1f2937';"
onmouseout="this.style.backgroundColor='transparent'; this.style.color='#6b7280';">
<span aria-hidden="true">×</span>
</button>
`;
}Step 6: Generate Body with Three Sections
Create the body section containing original text, action buttons, and text editor.
Body Container Generator
javascript
/**
 * Generates the modal body section HTML
 * @returns {string} HTML string for the body section
 */
generateBodyHTML() {
    return `
        <div style="${this.styleObjToString(MyExternalAiAssistant.STYLES.body)}">
            ${this.generateOriginalTextSection()}
            ${this.generateActionsSection()}
            ${this.generateTextEditorSection()}
        </div>
    `;
}
Original Text Section
javascript
/**
 * Generates the original text section HTML
 * @returns {string} HTML string for original text section
 */
generateOriginalTextSection() {
    return `
        <div style="margin-bottom: 24px;">
            <div style="font-size: 14px; font-weight: 600; color: #6b7280; text-transform: uppercase;
                        letter-spacing: 0.5px; margin-bottom: 12px;">
                Original Text
            </div>
            <div id="originalText" style="background-color: #f9fafb; border: 1px solid #e5e7eb;
                                          border-radius: 8px; padding: 16px; font-size: 14px;
                                          line-height: 1.6; color: #374151; max-height: 200px;
                                          overflow-y: auto;">
            </div>
        </div>
    `;
}
Actions Section with Quick Actions
javascript
/**
 * Generates the actions section HTML
 * @returns {string} HTML string for actions section
 */
generateActionsSection() {
    return `
        <div style="margin-bottom: 24px;">
            <div style="font-size: 14px; font-weight: 600; color: #6b7280; text-transform: uppercase;
                        letter-spacing: 0.5px; margin-bottom: 12px;">
                Quick Actions
            </div>
            <div style="display: flex; flex-wrap: wrap; gap: 12px; margin-bottom: 24px;">
                ${this.generateActionButtons()}
            </div>
        </div>
    `;
}

/**
 * Generates action button HTML
 * @returns {string} HTML string for action buttons
 */
generateActionButtons() {
    return Object.entries(MyExternalAiAssistant.TEXT_TRANSFORMATIONS).map(([action, config]) => `
        <button class="suggestion-btn" data-action="${action}"
            style="${this.styleObjToString(MyExternalAiAssistant.STYLES.suggestionButton)}"
            onmouseover="this.style.background='linear-gradient(135deg, #667eea 0%, #764ba2 100%)';
                         this.style.color='white'; this.style.borderColor='transparent';
                         this.style.transform='translateY(-2px)';
                         this.style.boxShadow='0 4px 12px rgba(102, 126, 234, 0.4)';"
            onmouseout="this.style.background='linear-gradient(135deg, #f5f7fa 0%, #e9ecef 100%)';
                        this.style.color='#495057'; this.style.borderColor='#dee2e6';
                        this.style.transform='translateY(0)'; this.style.boxShadow='none';">
            <span style="font-size: 16px;">${config.icon}</span>
            ${config.label}
        </button>
    `).join('');
}
Text Editor Section
javascript
/**
 * Generates the text editor section HTML
 * @returns {string} HTML string for text editor section
 */
generateTextEditorSection() {
    return `
        <div>
            <div style="font-size: 14px; font-weight: 600; color: #6b7280; text-transform: uppercase;
                        letter-spacing: 0.5px; margin-bottom: 12px;">
                Modified Text
            </div>
            <textarea id="text" placeholder="Your enhanced text will appear here..."
                style="width: 100%; min-height: 200px; padding: 16px; border: 2px solid #e5e7eb;
                       border-radius: 8px; font-size: 14px; line-height: 1.6; color: #1f2937;
                       resize: vertical; transition: border-color 0.3s; font-family: inherit;"
                onfocus="this.style.borderColor='#667eea';"
                onblur="this.style.borderColor='#e5e7eb';">
            </textarea>
        </div>
    `;
}
Key Features
- Three-Section Layout: Clear separation of original text, actions, and editable output
- Scrollable Original Text: Maximum height with overflow for long content
- Flexible Action Grid: Wraps buttons on smaller screens
- Hover Effects: Gradient transformation on button hover with smooth animations
- Editable Textarea: Users can manually edit generated text before applying
- Focus States: Visual feedback when textarea is focused
Step 7: Generate Footer with Action Buttons
Add footer section with cancel and apply buttons.
javascript
/**
 * Generates the modal footer section HTML
 * @returns {string} HTML string for the footer section
 */
generateFooterHTML() {
    return `
        <div style="${this.styleObjToString(MyExternalAiAssistant.STYLES.footer)}">
            <button class="cancelButton" style="${this.styleObjToString(MyExternalAiAssistant.STYLES.cancelButton)}"
                onmouseover="this.style.backgroundColor='#e5e7eb'; this.style.color='#4b5563';"
                onmouseout="this.style.backgroundColor='#f3f4f6'; this.style.color='#6b7280';">
                Cancel
            </button>
            <button class="okButton" style="${this.styleObjToString(MyExternalAiAssistant.STYLES.primaryButton)}"
                onmouseover="this.style.transform='translateY(-2px)';
                             this.style.boxShadow='0 4px 12px rgba(102, 126, 234, 0.4)';"
                onmouseout="this.style.transform='translateY(0)'; this.style.boxShadow='none';">
                Apply Changes
            </button>
        </div>
    `;
}

/**
 * Generates the disclaimer footer section HTML
 * @returns {string} HTML string for the disclaimer footer
 */
generateDisclaimerFooterHTML() {
    return `
        <div style="${this.styleObjToString(MyExternalAiAssistant.STYLES.disclaimerFooter)}">
            <p style="margin: 0; font-size: 13px; color: #92400e; font-weight: 500;">
                <span style="font-weight: 700; color: #d97706;">⚠️ Notice:</span> This popup window is not part of the plugin. It is intended solely for demonstration purposes and can be implemented independently in any desired way.
            </p>
        </div>
    `;
}
Step 8: Implement Event Handlers
Add event listeners to handle user interactions with the modal.
Attach Event Listeners
javascript
/**
 * Attaches event listeners to modal elements after creation
 */
attachEventListeners() {
    // Close button click handler
    this.externalAiAssistant.querySelector('.close')
        .addEventListener('click', this.cancelAndClose.bind(this));

    // Cancel button click handler
    this.externalAiAssistant.querySelector('.cancelButton')
        .addEventListener('click', this.cancelAndClose.bind(this));

    // OK button click handler
    this.externalAiAssistant.querySelector('.okButton')
        .addEventListener('click', this.onOkClick.bind(this));

    // Suggestion button click handlers
    const suggestionButtons = this.externalAiAssistant.querySelectorAll('.suggestion-btn');
    suggestionButtons.forEach(btn => {
        btn.addEventListener('click', (e) => this.handleSuggestion(e.currentTarget.dataset.action));
    });
}
Handle Text Transformations
javascript
/**
 * Handles suggestion button clicks
 * @param {string} action - The action to perform
 */
handleSuggestion(action) {
    const transformation = MyExternalAiAssistant.TEXT_TRANSFORMATIONS[action];
    if (!transformation) return;

    const textarea = this.externalAiAssistant.querySelector('#text');
    textarea.value = transformation.transform(this.originalText);
}
Real AI Integration
In production, the handleSuggestion method should make actual API calls to AI services.
Handle Apply and Cancel Actions
javascript
/**
 * Handles OK button click
 */
onOkClick() {
    const text = this.externalAiAssistant.querySelector('#text').value.replaceAll('\n', '<br/>');
    this.close();
    this.dataSelectCallback(text);
}

/**
 * Closes the modal and invokes the cancel callback
 */
cancelAndClose() {
    this.close();
    this.cancelCallback();
}

/**
 * Closes the modal dialog by hiding it from view
 */
close() {
    this.externalAiAssistant.style.display = 'none';
}
Key Implementation Details
- Data Attribute Pattern: Uses
data-actionattributes to identify which transformation to apply - Newline Conversion: Converts
\nto<br/>for HTML email compatibility - Callback Invocation: Ensures callbacks are called in correct order
- Modal State Management: Simple show/hide toggle using display property
Step 9: Register the Extension
Create src/extension.js to register your AI assistant with the Stripo extension system:
javascript
import {ExtensionBuilder} from '@stripoinc/ui-editor-extensions';
import {MyExternalAiAssistant} from './MyExternalAiAssistant';

export default new ExtensionBuilder()
    .withExternalAiAssistant(MyExternalAiAssistant)
    .build();
Extension Registration Explained
The ExtensionBuilder class provides a fluent API for registering integrations:
withExternalAiAssistant(): Registers your custom AI assistant implementationbuild(): Constructs and returns the final extension object for the editor
Multiple Integrations
Multiple .with*() methods can be chained to register different integrations within a single extension:
javascript
new ExtensionBuilder()
    .withExternalAiAssistant(MyExternalAiAssistant)
    .withExternalImageLibrary(MyExternalImageLibrary)
    .withExternalVideosLibrary(MyExternalVideosLibrary)
    .build();
Step 10: Run the Development Server
Your implementation is now ready for testing.
Start the Development Server
bash
npm run devThis command will:
- Start the Vite development server on
http://localhost:3000 - Automatically open your default browser
- Load the Stripo Editor with your AI assistant extension integrated
Complete Example
For a full working example, check out the complete implementation in our GitHub repository.